Extracting Russian casualties in Ukraine data from Mediazona publications

Introduction

In this blog post (corresponding to this notebook) we discuss data extraction techniques from the Web site Mediazona that tracks the Russian casualties in Ukraine. See [MZ1].

Since we did not find a public source code (or data) repository (like GitHub) of the data, we extract the data directly from the web site [MZ1]. We can use both (i) image processing and (ii) web browser automation. But since we consider the latter to be both time consuming and unreliable to reproduce, in this notebook we consider only image processing (combined with AI vision.)

We did not “harvest” all types of data from Mediazona, only the casualties per week and day for all troops. (Which we see as most important.)

This notebook is intentionally kept to be only “technical know-how”, without further data analysis, or correlation confirmations with other publications, or model applications, etc. We plan to do analysis and modeling in other notebooks/articles. (Using data from Mediazona and other sources.)

Remark: At the time of programming the extractions of this notebook, (2023-11-29), Midiazona, [MZ1], says that the Russian casualties it presents are corroborated by publicly available data as of 17 November, 2023.

Remark: Mediazona is Anti Putinist, [Wk1], and (judging from its publications) it is pro-Ukraine and pro-West.

Similar other data sources

Here is a couple of other data sources with similar intent or mission:

Remark: Those are pro-Russian sites.

TL;DR

Here is the data that is extracted below using image processing and OpenAI’s LLM vision capabilities, [AAn1, OAIb1]:

Here is the corresponding JSON file.

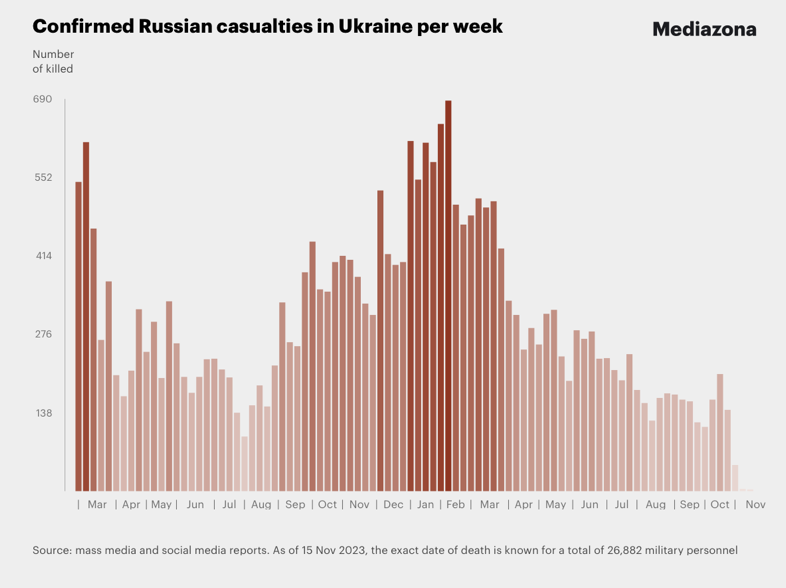
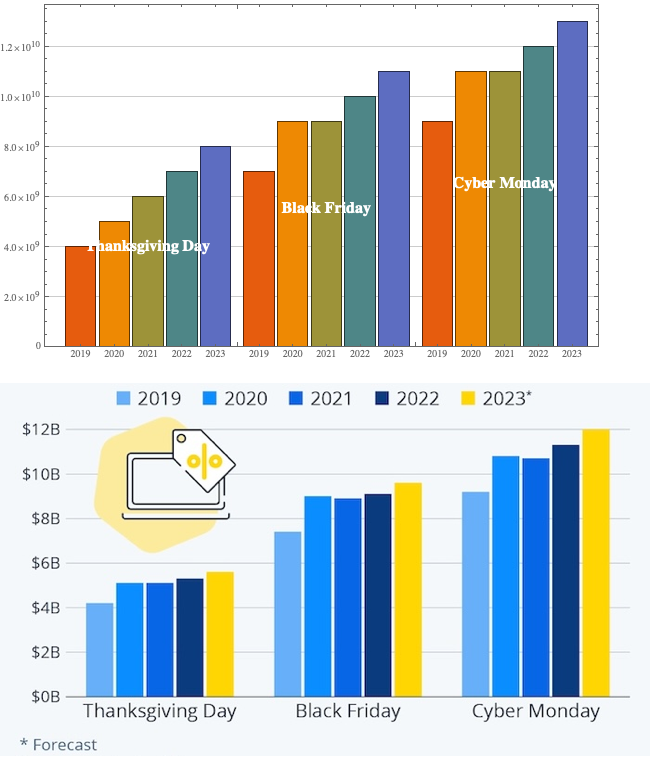
Here is a bar chart with tooltips for the weekly casualties that corresponds to the weekly casualties bar chart in [MZ1] (for all troops):

bcCol = RGBColor @@ ({143, 53, 33}/255);
xTicks = MapIndexed[{#2[[1]], DateString[First@#WeekSpan, {"MonthNameShort", " '", "YearShort"}]} &, mediaZonaData];
BarChart[Map[Tooltip[#["total_casualties"], Labeled[Grid[Map[{#[[1]], " : ", #[[2]]} &, List @@@ Normal[#["count_per_day"]]]], Column[{Style[#["week_span"], Blue], Row[{"total casualties:", Spacer[3], Style[#["total_casualties"], Red]}]}], Top]] &, mediaZonaData 
  ], 
  PlotTheme -> "Detailed", 
  FrameLabel -> Map[Style[#, FontSize -> 14] &, {"Week", "Number of killed"}], FrameTicks -> {{Automatic, Automatic}, {{#[[1]], Rotate[#[[2]], \[Pi]/6]} & /@ xTicks[[1 ;; -1 ;; 4]], Automatic}}, PlotLabel -> Style["Confirmed Russian casualties in Ukraine per week", Bold, FontSize -> 18], 
  ChartStyle -> Block[{tcs = Map[#["total_casualties"] &, mediaZonaData]}, Blend[{White, bcCol}, #] & /@ (tcs/Max[tcs])], 
  ImageSize -> 1000, 
  AspectRatio -> 1/1.8 
 ]

Document structure

The rest of document has the following sections:

  • Images with data
  • Weekly casualties extraction
  • Daily data extraction from daily bar chart
  • Daily data extraction from weekly bar chart tooltips
  • Additional comments and remarks

The second and fourth sections have subsections that outline the corresponding procedures.

Images with data

At first we got two images from [MZ1]: one for casualties per week and one for casualties per day. (For all troops.)

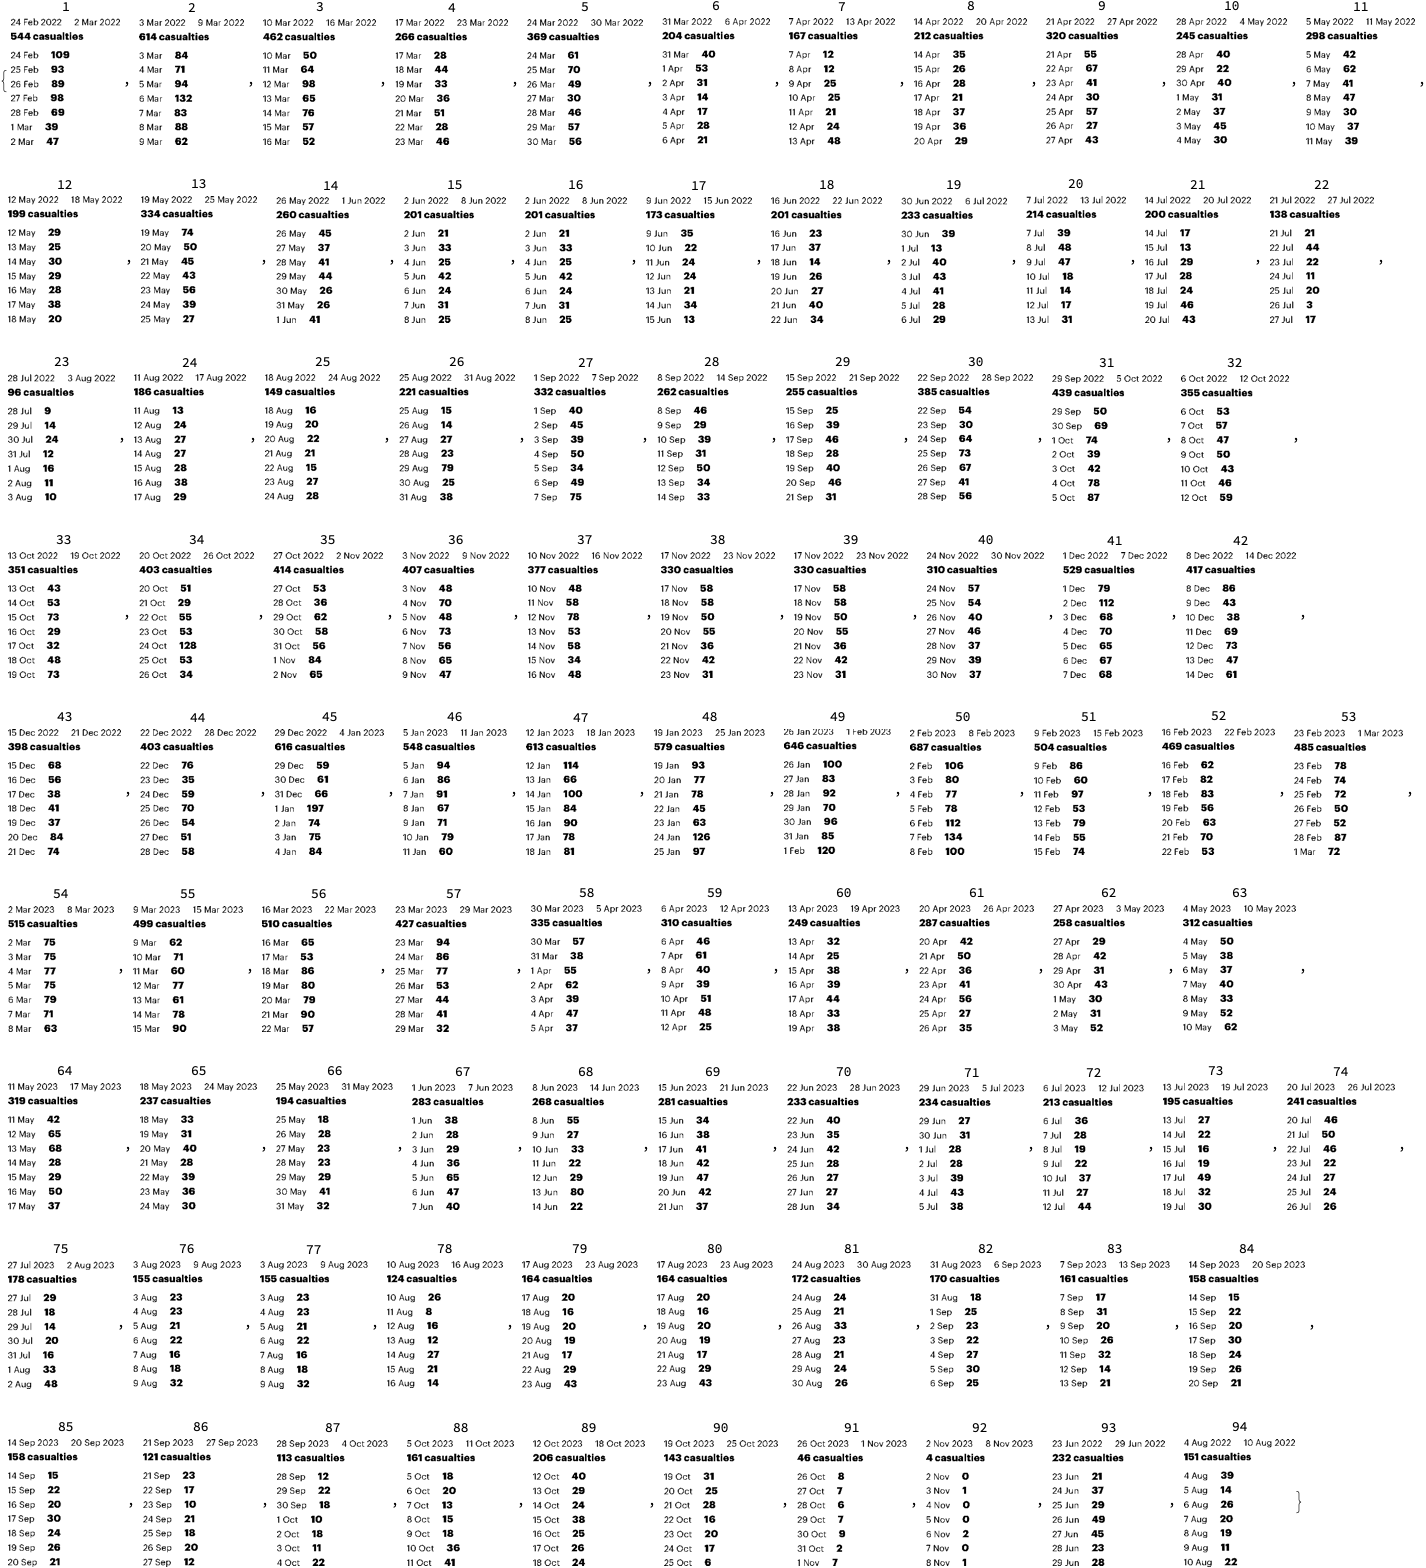
Then in order to extract more faithful daily casualties data we took ≈90 screenshots of the weekly casualties bar chart at [MZ1], each screenshot with a tooltip shown for a different week.

Casualties per week

Casualties per day

Screenshots of weekly bar chart with tooltips

In order to get more faithful data readings of the daily casualties multiple (≈90) screenshots were taken of the weekly casualties bar chart, each of the screenshots having a tooltip table of one (unique) bar. It took ≈15 minutes to take those screenshots. They can be obtained from this Google Drive link.

Here is how one of them looks like:

Number of days and number weeks

Here is the number of weeks we expect to see in the “Casualties per week” plot:

nWeeks = Round@DateDifference[DateObject[{2022, 02, 24}], DateObject[{2023, 11, 17}], "Week"]

(* 90 wk *)

Here is the number of days we expect to see in the “Casualties per day” plot:

nDays = Round@DateDifference[DateObject[{2022, 02, 24}], DateObject[{2023, 11, 03}]]

(*617 days*)

Weekly data extraction

Procedure

Here is the outline of the procedure:

  • Crop the image, so only the bar chart elements are on it
  • Binarize the image, and negated
    • So all visible bars are white on black background
  • Extracting morphological components
  • Find the bar sizes from the extracted components
  • Rescale to match real data
  • Check the absolute and relative errors between derived total number of casualties and the published one

Crop image

Here we take “the bars only” part of the image:

imgCasualtiesPerWeek2 = ImageTake[imgCasualtiesPerWeek, {120, -140}, {100, -60}]

Binarization and color negation

Binarize the cropped the image:

img = Binarize[imgCasualtiesPerWeek2, 0.85]

Here we binarize and color negate the image:

img2 = ColorNegate@Binarize[img]

Extracting morphological components

Here is the result of an application of morphological components finder:

MorphologicalComponents[img2] // Colorize

Find the bounding boxes of the morphological components:

aBoxes = SortBy[Association[ComponentMeasurements[img2, "BoundingBox"]], #[[1, 1]] &];
aBoxes = AssociationThread[Range@Length@aBoxes, Values@aBoxes];
aBoxes[[1 ;; 4]]

(*<|1 -> {{14., 6.}, {24., 473.}}, 2 -> {{25., 6.}, {35., 533.}}, 3 -> {{37., 6.}, {47., 402.}}, 4 -> {{48., 6.}, {58., 235.}}|>*)

Here we see are all component bounding boxes having the same minimum y-coordinate:

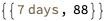
Tally@Values[aBoxes][[All, 1, 2]]

(*{{6., 66}, {7., 22}}*)

Find the heights of the rectangles and make a corresponding bar plot:

(*aHeights=Map[#\[LeftDoubleBracket]2,2\[RightDoubleBracket]-#\[LeftDoubleBracket]1,2\[RightDoubleBracket]&,aBoxes];*)
  aHeights = Map[#[[2, 2]] - Min[Values[aBoxes][[All, 1, 2]]] &, aBoxes]; 
   BarChart[aHeights, PlotTheme -> "Detailed", ImageSize -> 900]

Rescaling to match real data

The extracted data has to be rescaled to match the reported data. (We can see we have to “calibrate” the extracted data over a few points of the real data.)

Here we remake the plot above to include characteristic points we can use the calibration:

pos = Position[aHeights, Max[aHeights]][[1, 1, 1]];
pos2 = 23;
aHeights2 = aHeights;
Do[aHeights2[p] = Callout[aHeights2[[p]]], {p, {1, pos2, pos}}];
BarChart[aHeights2, GridLines -> {pos, None}, PlotTheme -> "Detailed",ImageSize -> 900]

Here are a few characteristic points of the real data

aRealHeights = <|1 -> 544, 7 -> 167, 23 -> 96, pos2 -> 414, pos -> 687|>

(*<|1 -> 544, 7 -> 167, 23 -> 414, 50 -> 687|>*)

Rescaling formula:

frm = Rescale[x, {aHeights[pos2], aHeights[pos]}, {aRealHeights[pos2], aRealHeights[pos]}]

(*369.219 + 0.539526 x*)
frm = Rescale[x, {0, aHeights[pos]}, {0, aRealHeights[pos]}]

(*0. + 1.16638 x*)

Rescaling function:

f = With[{fb = frm /. x -> Slot[1]}, fb &]

(*0. + 1.16638 #1 &*)

Apply the rescaling function:

aHeightsRescaled = Ceiling@*f /@ aHeights

(*<|1 -> 545, 2 -> 615, 3 -> 462, 4 -> 268, 5 -> 370, 6 -> 205, 7 -> 168, 8 -> 213, 9 -> 321, 10 -> 247, 11 -> 299, 12 -> 200, 13 -> 335, 14 -> 261, 15 -> 202, 16 -> 174, 17 -> 202, 18 -> 233, 19 -> 234, 20 -> 215, 21 -> 201, 22 -> 139, 23 -> 97, 24 -> 152, 25 -> 187, 26 -> 150, 27 -> 222, 28 -> 333, 29 -> 263, 30 -> 256, 31 -> 385, 32 -> 440, 33 -> 356, 34 -> 352, 35 -> 404, 36 -> 415, 37 -> 408, 38 -> 378, 39 -> 331, 40 -> 311, 41 -> 530, 42 -> 418, 43 -> 399, 44 -> 404, 45 -> 616, 46 -> 549, 47 -> 614, 48 -> 580, 49 -> 647, 50 -> 687, 51 -> 504, 52 -> 469, 53 -> 486, 54 -> 516, 55 -> 500, 56 -> 511, 57 -> 427, 58 -> 336, 59 -> 311, 60 -> 250, 61 -> 289, 62 -> 259, 63 -> 313, 64 -> 320, 65 -> 238, 66 -> 195, 67 -> 284, 68 -> 269, 69 -> 282, 70 -> 234, 71 -> 235, 72 -> 214, 73 -> 196, 74 -> 242, 75 -> 179, 76 -> 156, 77 -> 125, 78 -> 165, 79 -> 173, 80 -> 171, 81 -> 163, 82 -> 159, 83 -> 122, 84 -> 114, 85 -> 163, 86 -> 207, 87 -> 144, 88 -> 47|>*)

Here are some easy to check points (post-rescaling):

KeyTake[aHeightsRescaled, {1, 2, 7, Length[aHeightsRescaled]}]

(*<|1 -> 545, 2 -> 615, 7 -> 168, 88 -> 47|>*)

Verification check

Here is the image-extraction, estimated total:

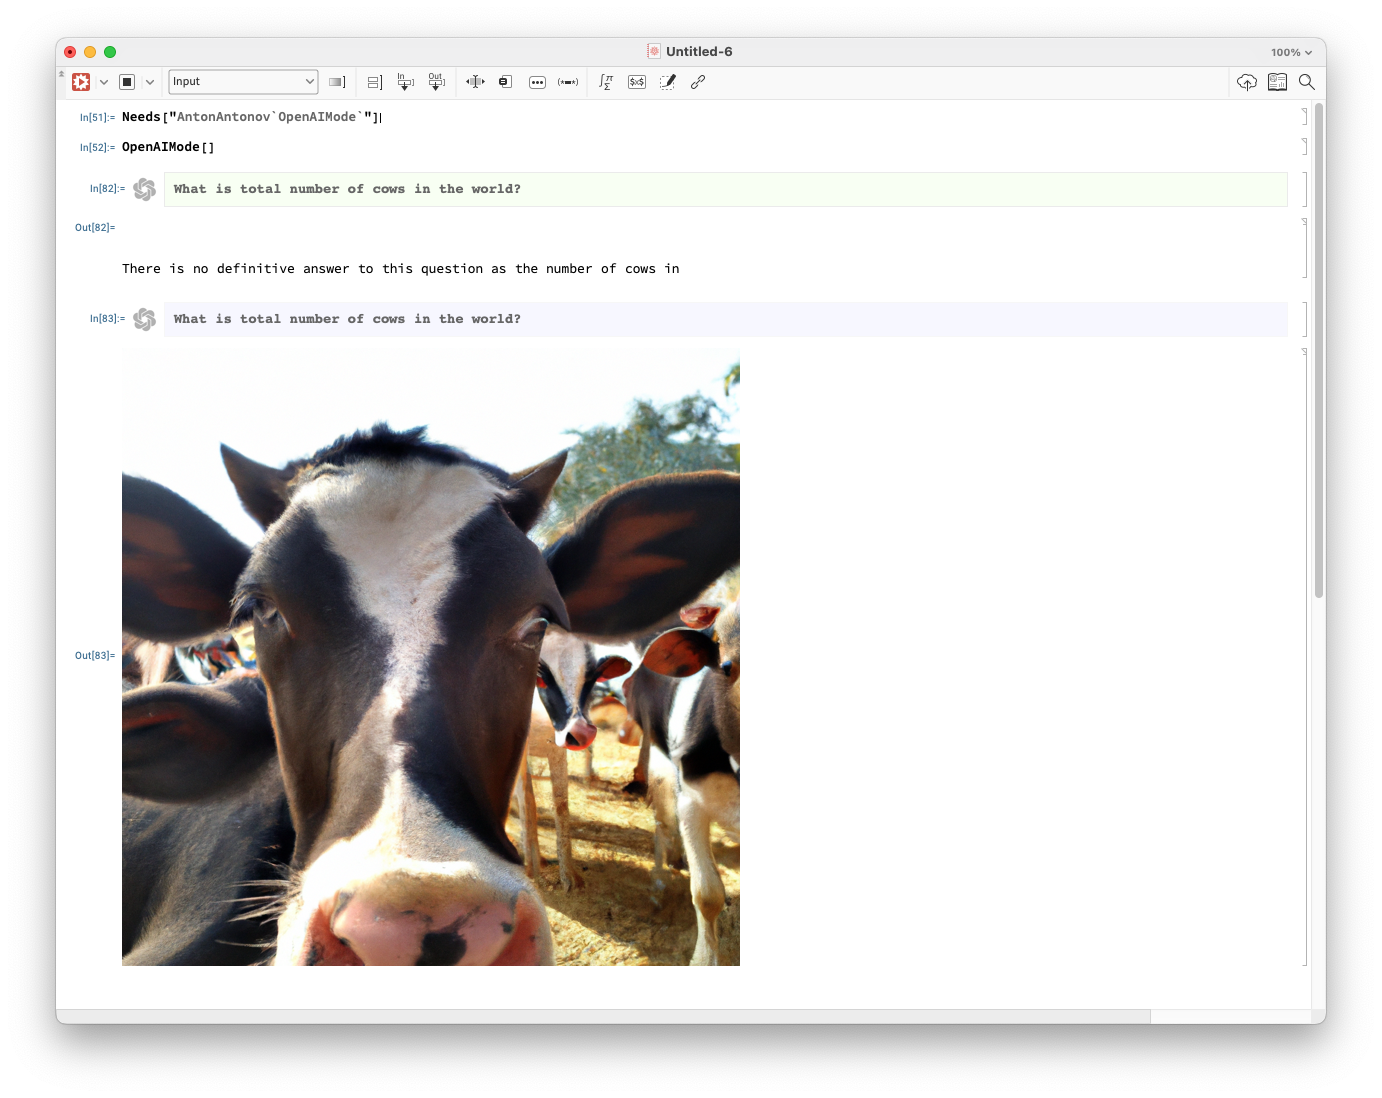
imgTotal = aHeightsRescaled // Total

(*26961*)

The estimated total is close to the reported $26882$, with $79$absolute error and$\approx 3$‰ relative error:

reportTotal = 26882;
errAbs = N@Abs[reportTotal - imgTotal]
errRatio = N@Abs[reportTotal - imgTotal]/reportTotal

(*79.*)

(*0.00293877*)

Remark: The reported total number of casualties can be seen in the original weekly casualties screenshot above.

Daily data extraction from daily bar chart

Daily casualties extraction is not that easy with technique applied to the weekly casualties plot. One of the reasons is that the daily casualties plot is also a user input interface(on that web page).

Since we want to get daily data for calibration of (generalized) Lanchester law models we can simply extrapolate the weekly data with daily averages. We can also over-impose in some way the two images (or plots) in order to convince ourselves that we have a faithful enough interpolation.

lsDailyHeightsRescaled = Flatten@Map[Table[#, 7]/7 &, Values[aHeightsRescaled]];
BarChart[lsDailyHeightsRescaled, ImageSize -> 900, AspectRatio -> 1/8,PlotTheme -> "Web"]

Nevertheless, more faithful daily data can be obtained by image- and LLM processing the tooltips of the weekly casualties chart. (See the next section.)


Daily data extraction from weekly bar chart tooltips

Procedure

Here is the procedure outline:

  • Take multiple screenshots of the weekly casualties bar chart
    • A screenshot for each week with the corresponding tooltip shown
    • Make sure all screenshots have the same size (or nearly the same size)
      • E.g. take “window screenshots”
    • ≈90 screenshots can be taken within 15 minutes
  • Crop the screenshots appropriately
  • In order to get the tooltip tables only for each screenshot:
  • Verify good tooltips table image is obtained for each screenshot (week)
  • Do Optical Character Recognition (OCR) over the images
    • One option is to send them to an Artificial Intelligence (AI) vision service
    • Another option is to use WL’s TextRecognize
  • Parse or otherwise process the obtained OCR (or AI vision) results
  • Verify that each week is reflected in the data
    • It might happen that screenshots are not “a full set“
  • Make time series with the obtained data and compare or verify with published data and plots
    • Check are the casualties totals the same, do the plots look similar, etc.
  • Make an informative bar chart with tooltips
    • That resembles the one the screenshots were taken from
    • See the subsection “TL;DR” in the introduction

Remark: When using AI vision the prompt engineering might take a few iterations, but not that many.

Remark: The few experiments with the WL built-in text recognition produced worse results than using AI vision. Hence, they were not extended further.

Screenshots ingestion

Get screenshot file names

dirNameImport = FileNameJoin[{NotebookDirectory[], "Screenshots-Mediazona-weekly-casualties-histogram"}];
lsFileNames = FileNames["*.png", dirNameImport];
Length[lsFileNames]

(*94*)

Import images

AbsoluteTiming[
  lsImgs = Import /@ lsFileNames; 
 ]

(*{2.50844, Null}*)

Here is one of the imported images:

ImageResize[lsImgs[[14]], 900]

Definition

Here define a function that is used to batch transform the screenshots:

Clear[MakeEasyToRead];
Options[MakeEasyToRead] = {"BoundingBox" -> Automatic, "BinarizingLimits" -> Automatic};
MakeEasyToRead[img_?ImageQ, opts : OptionsPattern[]] := 
   Block[{boundingBox, mbLimits, img2, img3}, 
    
    boundingBox = OptionValue[MakeEasyToRead, "BoundingBox"]; 
    If[TrueQ[boundingBox === Automatic], boundingBox = {{380, -180}, {280, -280}}]; 
    
    mbLimits = OptionValue[MakeEasyToRead, "BinarizingLimits"]; 
    If[TrueQ[mbLimits === Automatic], mbLimits = {0.2, 0.75}]; 
    
    img2 = ImageTake[img, Sequence @@ boundingBox]; 
    img3 = MorphologicalBinarize[ColorNegate@img2, mbLimits]; 
    ImageCrop[ColorNegate[img3]] 
   ];

Remark: This function corresponds to the second and third step of the procedure outlined above.

Batch transform

AbsoluteTiming[
  lsImgTables = MakeEasyToRead[#, "BoundingBox" -> {{380, -100}, {280, -280}}, "BinarizingLimits" -> {0.4, 0.76}] & /@ lsImgs; 
 ]

(*{9.76089, Null}*)
MapIndexed[Labeled[#, #2[[1]], Top] &, lsImgTables]

Batch AI-vision application

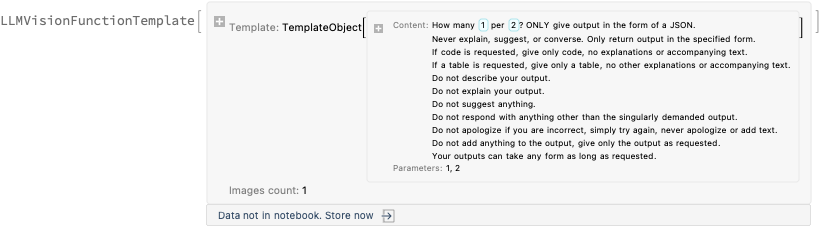
Load the package “LLMVision.m”, [AAp1, AAn1]:

Import["https://raw.githubusercontent.com/antononcube/MathematicaForPrediction/master/Misc/LLMVision.m"]

Here we do batch AI vision application, [AAn1], using an appropriate prompt:

h = 11;
AbsoluteTiming[
  lsImgTableJSONs = 
    Table[(
      Echo[Style[{i, i + (h - 1)}, Purple, Bold], "Span:"]; 
      t = 
       LLMVisionSynthesize[{
         "Get the 1) week span, 2) total casualties 3) count per day from the image.\n", 
         "Give the result as a JSON record with keys 'week_span', 'total_casualties', and 'count_per_day'.\n", 
         "Here is example of the JSON record for each image:{\"week_span\": \"10 Mar 2022 - 16 Mar 2022\",\"total_casualties\": 462,\"count_per_day\": {\"10 Mar\": 50,\"11 Mar\": 64,\"12 Mar\": 98,\"13 Mar\": 65,\"14 Mar\": 76,\"15 Mar\": 57,\"16 Mar\": 52}}", 
         LLMPrompt["NothingElse"]["JSON"] 
        }, 
        Take[lsImgTables, {i, UpTo[i + (h - 1)]}], 
        "MaxTokens" -> 1200, "Temperature" -> 0.1]; 
      Echo[t, "OCR:"]; 
      t 
     ), 
     {i, 1, Length[lsImgs], h}]; 
 ]
(*{260.739, Null}*)

Process AI-vision results

Extract JSONs and import them as WL structures:

pres1 = Map[ImportString[StringReplace[#, {"```json" -> "", "```" -> ""}], "RawJSON"] &, lsImgTableJSONs];
pres1[[1 ;; 2]]

(*{{<|"week_span" -> "24 Feb 2022 - 2 Mar 2022", "total_casualties" -> 544, "count_per_day" -> <|"24 Feb" -> 109, "25 Feb" -> 93, "26 Feb" -> 89, "27 Feb" -> 98, "28 Feb" -> 69, "1 Mar" -> 39, "2 Mar" -> 47|>|>, <|"week_span" -> "3 Mar 2022 - 9 Mar 2022", "total_casualties" -> 614, "count_per_day" -> <|"3 Mar" -> 84, "4 Mar" -> 71, "5 Mar" -> 94, "6 Mar" -> 132, "7 Mar" -> 83, "8 Mar" -> 88, "9 Mar" -> 62|>|>, <|"week_span" -> "10 Mar 2022 - 16 Mar 2022", "total_casualties" -> 462, "count_per_day" -> <|"10 Mar" -> 50, "11 Mar" -> 64, "12 Mar" -> 98, "13 Mar" -> 65, "14 Mar" -> 76, "15 Mar" -> 57, "16 Mar" -> 52|>|>, <|"week_span" -> "17 Mar 2022 - 23 Mar 2022","total_casualties" -> 266, "count_per_day" -> <|"17 Mar" -> 28, "18 Mar" -> 44, "19 Mar" -> 33, "20 Mar" -> 36, "21 Mar" -> 51, "22 Mar" -> 28, "23 Mar" -> 46|>|>, <|"week_span" -> "24 Mar 2022 - 30 Mar 2022","total_casualties" -> 369, "count_per_day" -> <|"24 Mar" -> 61, "25 Mar" -> 70, "26 Mar" -> 49, "27 Mar" -> 30, "28 Mar" -> 46, "29 Mar" -> 57, "30 Mar" -> 56|>|>, <|"week_span" -> "31 Mar 2022 - 6 Apr 2022", "total_casualties" -> 204, "count_per_day" -> <|"31 Mar" -> 40, "1 Apr" -> 53, "2 Apr" -> 31, "3 Apr" -> 14, "4 Apr" -> 17, "5 Apr" -> 28, "6 Apr" -> 21|>|>, <|"week_span" -> "7 Apr 2022 - 13 Apr 2022", "total_casualties" -> 167, "count_per_day" -> <|"7 Apr" -> 12, "8 Apr" -> 12, "9 Apr" -> 25, "10 Apr" -> 25, "11 Apr" -> 21, "12 Apr" -> 24, "13 Apr" -> 48|>|>, <|"week_span" -> "14 Apr 2022 - 20 Apr 2022","total_casualties" -> 212, "count_per_day" -> <|"14 Apr" -> 35, "15 Apr" -> 26, "16 Apr" -> 28, "17 Apr" -> 21, "18 Apr" -> 37, "19 Apr" -> 36, "20 Apr" -> 29|>|>, <|"week_span" -> "21 Apr 2022 - 27 Apr 2022","total_casualties" -> 320, "count_per_day" -> <|"21 Apr" -> 55, "22 Apr" -> 67, "23 Apr" -> 41, "24 Apr" -> 30, "25 Apr" -> 57, "26 Apr" -> 27, "27 Apr" -> 43|>|>, <|"week_span" -> "28 Apr 2022 - 4 May 2022", "total_casualties" -> 245, "count_per_day" -> <|"28 Apr" -> 40, "29 Apr" -> 22, "30 Apr" -> 40, "1 May" -> 31, "2 May" -> 37, "3 May" -> 45, "4 May" -> 30|>|>, <|"week_span" -> "5 May 2022 - 11 May 2022", "total_casualties" -> 298, "count_per_day" -> <|"5 May" -> 42, "6 May" -> 62, "7 May" -> 41, "8 May" -> 47, "9 May" -> 30, "10 May" -> 37, "11 May" -> 39|>|>}, {<|"week_span" -> "12 May 2022 - 18 May 2022", "total_casualties" -> 199, "count_per_day" -> <|"12 May" -> 29, "13 May" -> 25, "14 May" -> 30, "15 May" -> 29, "16 May" -> 28, "17 May" -> 38, "18 May" -> 20|>|>, <|"week_span" -> "19 May 2022 - 25 May 2022","total_casualties" -> 334, "count_per_day" -> <|"19 May" -> 74, "20 May" -> 50, "21 May" -> 45, "22 May" -> 43, "23 May" -> 56, "24 May" -> 39, "25 May" -> 27|>|>, <|"week_span" -> "26 May 2022 - 1 Jun 2022", "total_casualties" -> 260, "count_per_day" -> <|"26 May" -> 45, "27 May" -> 37, "28 May" -> 41, "29 May" -> 44, "30 May" -> 26, "31 May" -> 26, "1 Jun" -> 41|>|>, <|"week_span" -> "2 Jun 2022 - 8 Jun 2022", "total_casualties" -> 201, "count_per_day" -> <|"2 Jun" -> 21, "3 Jun" -> 33, "4 Jun" -> 25, "5 Jun" -> 42, "6 Jun" -> 24, "7 Jun" -> 31, "8 Jun" -> 25|>|>, <|"week_span" -> "9 Jun 2022 - 15 Jun 2022", "total_casualties" -> 173, "count_per_day" -> <|"9 Jun" -> 35, "10 Jun" -> 22, "11 Jun" -> 24,"12 Jun" -> 24, "13 Jun" -> 21, "14 Jun" -> 34, "15 Jun" -> 13|>|>, <|"week_span" -> "16 Jun 2022 - 22 Jun 2022","total_casualties" -> 201, "count_per_day" -> <|"16 Jun" -> 23, "17 Jun" -> 37, "18 Jun" -> 14, "19 Jun" -> 26, "20 Jun" -> 27, "21 Jun" -> 40, "22 Jun" -> 34|>|>, <|"week_span" -> "30 Jun 2022 - 6 Jul 2022", "total_casualties" -> 233, "count_per_day" -> <|"30 Jun" -> 39, "1 Jul" -> 13, "2 Jul" -> 40, "3 Jul" -> 43, "4 Jul" -> 41, "5 Jul" -> 28, "6 Jul" -> 29|>|>, <|"week_span" -> "7 Jul 2022 - 13 Jul 2022", "total_casualties" -> 214, "count_per_day" -> <|"7 Jul" -> 39, "8 Jul" -> 48, "9 Jul" -> 47, "10 Jul" -> 18, "11 Jul" -> 14, "12 Jul" -> 17, "13 Jul" -> 31|>|>, <|"week_span" -> "14 Jul 2022 - 20 Jul 2022","total_casualties" -> 200, "count_per_day" -> <|"14 Jul" -> 17, "15 Jul" -> 13, "16 Jul" -> 29, "17 Jul" -> 28, "18 Jul" -> 24, "19 Jul" -> 46, "20 Jul" -> 43|>|>, <|"week_span" -> "21 Jul 2022 - 27 Jul 2022","total_casualties" -> 138, "count_per_day" -> <|"21 Jul" -> 21, "22 Jul" -> 44, "23 Jul" -> 22, "24 Jul" -> 11, "25 Jul" -> 20, "26 Jul" -> 3, "27 Jul" -> 17|>|>}}*)

Make a list of weekly records and make sure to have unique data records:

pres2 = Union[Flatten[pres1]];
Length[pres2]

(*89*)

To each record add a WL expression for the extracted week span and sort the records by week start date:

pres3 = Map[Prepend[#, "WeekSpan" -> Map[DateObject@*StringTrim, StringSplit[#["week_span"], "-"]]] &, pres2];
pres3 = SortBy[pres3, First@#WeekSpan &];

Here are the first two records:

pres3[[1 ;; 2]]

Verification (all weeks are present)

Summarize the starts of week:

ResourceFunction["RecordsSummary"][Map[First@#WeekSpan &, pres3]]

Make sure consistent weekly data is obtained:

Differences[Sort@Map[First@#WeekSpan &, pres3]] // Tally

Plots

Here is bar chart with tooltips based using the extracted data:

BarChart[Tooltip[#["total_casualties"], Labeled[Grid[Map[{#[[1]], " : ", #[[2]]} &, List @@@ Normal[#["count_per_day"]]]], Column[{Style[#["week_span"], Blue], Row[{"total casualties:", Spacer[3], Style[#["total_casualties"], Red]}]}], Top]] & /@ pres3, AxesLabel -> {"Week", "Number of\nkilled"}, ImageSize -> 700]

Remark: See the subsection “TL;DR” in the introduction for a better plot.

Here we make the corresponding daily casualties time series and plot it:

pres4 = Map[AssociationThread[DateRange @@ #WeekSpan, Values[#["count_per_day"]]] &, pres3];
pres5 = Join @@ pres4;
tsCasualties = TimeSeries[pres5];
DateListPlot[tsCasualties, PlotRange -> All, AspectRatio -> 1/6, FrameLabel -> {"Time", "Number of killed"}, ImageSize -> 1200]

Verification (with published results)

Here is the total number casualties based on the extracted data:

tooltipTotal = Total@tsCasualties

(*26879*)

It compares very well with the total number in the Mediazona’s plot — $3$ as an absolute error and$\approx 0.1$‰ relative error:

reportTotal = 26882;
errAbs = N@Abs[reportTotal - tooltipTotal]
errRatio = N@Abs[reportTotal - tooltipTotal]/reportTotal

(*3.*)

(*0.000111599*)

Additional comments and remarks

Good agreement between the two procedures

The two data extraction procedures agree very well over the extracted totals of casualties.

(Also good agreement with the “official” published total — approximately $3$‰ and $0.1$‰ respectively.)

LLMVision package

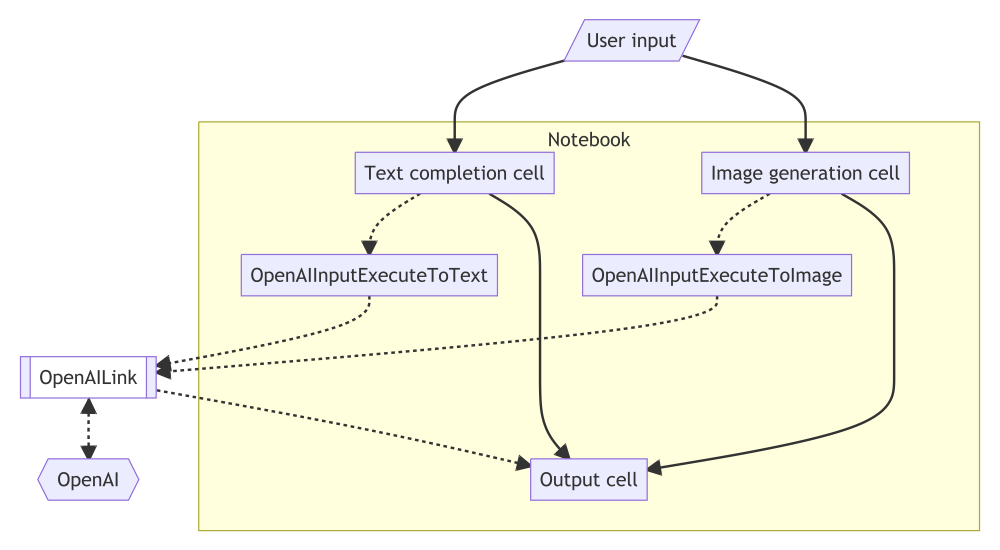
The function LLMVisionSynthesize used above is from the package “LLMVision.m”, [AAp1, AAn1]. One of the primary reasons to develop the package “LLMvision.m” was to use it in workflows like those above — extracting data from different sources in order to do war simulations.

Remark: In the section above LLMVisionSynthesize uses Base64 conversion of images. OpenAI’s Vision documentation advices to use URLs instead of Base64 images in long conversations.

Why apply image transformations when using AI vision?

One can ask:

Why do certain image transformations, or other image preprocessing, if we are using AI vision functionalities? 

Can’t we just apply the AI?!

There are multiple reasons for preprocessing the images that are on different conceptual and operational levels:

  • We want to be able to use the same workflow but with different OCR algorithms that are “smaller” and “less AI”
  • Images having only the information to be extracted produce more reliable results
    • This obvious when OCR functions are used (like TextRecognize)
    • Less prompt engineering would be needed with AI-vision (most likely)
  • It is much cheaper — both computationally and money-wise — to use some smaller images for processed conveniently

Remark: OpenAI’s vision documentation discusses the money costs, preferred image formats, and reliability — see this “Limitations” section.

JSON data

The extracted daily Mediazona data was exported to JSON with this command:

(*Export[FileNameJoin[{NotebookDirectory[],"mediaZonaData.json"}],Map[Normal,mediaZonaData]/.d_DateObject:>DateString[d,"ISODate"]]*)

References

Articles

[MZ1] Mediazona, Russian casualties in Ukraine, (2022-2023).

[OAIb1] OpenAI team, “New models and developer products announced at DevDay” , (2023), OpenAI/blog .

[Wk1] Wikipedia, “Mediazona”.

Functions

[WRIf1] Wolfram Research, Inc., MorphologicalBinarize, Wolfram Language function,(2010), (updated 2012).

[WRIf2] Wolfram Research, Inc, ImageCrop, Wolfram Language function,(2008), (updated 2021).

[WRIf3] Wolfram Research, Inc, TextRecognize, Wolfram Language function,(2010), (updated 2020).

Notebooks

[AAn1] Anton Antonov, “AI vision via Wolfram Language​​”, November 26, (2023), Wolfram Community, STAFF PICKS.

Packages, paclets

[AAp1] Anton Antonov, LLMVision.m, Mathematica package, (2023), GitHub/antononcube .

AI vision via Wolfram Language

Introduction

In the fall of 2023 OpenAI introduced the image vision model “gpt-4-vision-preview”, [OAIb1].

The model “gpt-4-vision-preview” represents a significant enhancement to the GPT-4 model, providing developers and AI enthusiasts with a more versatile tool capable of interpreting and narrating images alongside text. This development opens up new possibilities for creative and practical applications of AI in various fields.

For example, consider the following Wolfram Language (WL), developer-centric applications:

  • Narration of UML diagrams
  • Code generation from narrated (and suitably tweaked) narrations of architecture diagrams and charts
  • Generating presentation content draft from slide images
  • Extracting information from technical plots
  • etc.

A more diverse set of the applications would be:

  • Dental X-ray images narration
  • Security or baby camera footage narration
    • How many people or cars are seen, etc.
  • Transportation trucks content descriptions
    • Wood logs, alligators, boxes, etc.
  • Web page visible elements descriptions
    • Top menu, biggest image seen, etc.
  • Creation of recommender systems for image collections
    • Based on both image features and image descriptions
  • etc.

As a first concrete example, consider the following image that fable-dramatizes the name “Wolfram” (https://i.imgur.com/UIIKK9w.jpg):

RemoveBackground@Import[URL["https://i.imgur.com/UIIKK9wl.jpg"]]
1xg1w9gct6yca

Here is its narration:

LLMVisionSynthesize["Describe very concisely the image", "https://i.imgur.com/UIIKK9w.jpg", "MaxTokens" -> 600]

You are looking at a stylized black and white illustration of a wolf and a ram running side by side among a forest setting, with a group of sheep in the background. The image has an oval shape.

Remark: In this notebook Mathematica and Wolfram Language (WL) are used as synonyms.

Remark: This notebook is the WL version of the notebook “AI vision via Raku”, [AA3].

Ways to use with WL

There are five ways to utilize image interpretation (or vision) services in WL:

  • Dedicated Web API functions, [MT1, CWp1]
  • LLM synthesizing, [AAp1, WRIp1]
  • LLM functions, [AAp1, WRIp1]
  • Dedicated notebook cell type, [AAp2, AAv1]
  • Any combinations of the above

In this document are demonstrated the second, third, and fifth. The first one is demonstrated in the Wolfram Community post “Direct API access to new features of GPT-4 (including vision, DALL-E, and TTS)” by Marco Thiel, [MT1]. The fourth one is still “under design and consideration.”

Remark: The model “gpt-4-vision-preview” is given as a “chat completion model” , therefore, in this document we consider it to be a Large Language Model (LLM).

Packages and paclets

Here we load WL package used below, [AAp1, AAp2, AAp3]:

Import["https://raw.githubusercontent.com/antononcube/MathematicaForPrediction/master/Misc/LLMVision.m"]

Remark: The package LLMVision is “temporary” – It should be made into a Wolfram repository paclet, or (much better) its functionalities should be included in the “LLMFunctions” framework, [WRIp1].

Images

Here are the links to all images used in this document:

tblImgs = {{Row[{"Wolf and ram running together in forest"}], Row[{"https://i.imgur.com/UIIKK9w.jpg", ""}]}, {Row[{"LLM", " ", "functionalities", " ", "mind-map", ""}], Row[{"https://i.imgur.com/kcUcWnql.jpg", ""}]}, {Row[{"Single", " ", "sightseer", ""}], Row[{"https://i.imgur.com/LEGfCeql.jpg", ""}]}, {Row[{"Three", " ", "hunters", ""}], Row[{"https://raw.githubusercontent.com/antononcube/Raku-WWW-OpenAI/main/resources/ThreeHunters.jpg", ""}]}, {Row[{"Cyber", " ", "Week", " ", "Spending", " ", "Set", " ", "to", " ", "Hit", " ", "New", " ", "Highs", " ", "in", " ", "2023", ""}], Row[{"https://cdn.statcdn.com/Infographic/images/normal/7045.jpeg", ""}]}};
tblImgs = Map[Append[#[[1 ;; 1]], Hyperlink[#[[-1, 1, 1]]]] &, tblImgs];
TableForm[tblImgs, TableHeadings -> {None, {"Name", "Link"}}] /. {ButtonBox[n_, BaseStyle -> "Hyperlink", ButtonData -> { URL[u_], None}] :> Hyperlink[n, URL[u]]}
Name Link
Wolf and ram running together in forest Link
LLM functionalities mind-map Link
Single sightseer Link
Three hunters Link
Cyber Week Spending Set to Hit New Highs in 2023 Link

Document structure

Here is the structure of the rest of the document:

  • LLM synthesizing
    … using multiple image specs of different kind.
  • LLM functions
    … workflows over technical plots.
  • Dedicated notebook cells
    … just excuses why they are not programmed yet.
  • Combinations (fairytale generation)
    … Multi-modal applications for replacing creative types.
  • Conclusions and leftover comments
    … frustrations untold.

LLM synthesizing

The simplest way to use the OpenAI’s vision service is through the function LLMVisionSynthesize of the package “LLMVision”, [AAp1]. (Already demoed in the introduction.)

If the function LLMVisionSynthesize is given a list of images, a textual result corresponding to those images is returned. The argument “images” is a list of image URLs, image file names, or image Base64 representations. (Any combination of those element types can be specified.)

Before demonstrating the vision functionality below we first obtain and show a couple of images.

Images

Here is a URL of an image: (https://i.imgur.com/LEGfCeql.jpg). Here is the image itself:

Import[URL["https://i.imgur.com/LEGfCeql.jpg"]]
1u02ytqvf7xi9

OpenAI’s vision endpoint accepts POST specs that have image URLs or images converted into Base64 strings. When we use the LLMVisionSynthesize function and provide a file name under the “images” argument, the Base64 conversion is automatically applied to that file. Here is an example of how we apply Base64 conversion to the image  from a given file path:

img1 = Import[$HomeDirectory <> "/Downloads/ThreeHunters.jpg"];
ColumnForm[{
   img1, 
   Spacer[10], 
   ExportString[img1, {"Base64", "JPEG"}] // Short}]
0wmip47gloav0

Image narration

Here is an image narration example with the two images above, again, one specified with a URL, the other with a file path:

LLMVisionSynthesize["Give concise descriptions of the images.", {"https://i.imgur.com/LEGfCeql.jpg", $HomeDirectory <> "/Downloads/ThreeHunters.jpg"}, "MaxTokens" -> 600]

1. The first image depicts a single raccoon perched on a tree branch, surrounded by a plethora of vibrant, colorful butterflies in various shades of blue, orange, and other colors, set against a lush, multicolored foliage background.

2. The second image shows three raccoons sitting together on a tree branch in a forest setting, with a warm, glowing light illuminating the scene from behind. The forest is teeming with butterflies, matching the one in the first image, creating a sense of continuity and shared environment between the two scenes.

Description of a mind-map

Here is an application that should be more appealing to WL-developers – getting a description of a technical diagram or flowchart. Well, in this case, it is a mind-map from [AA2]:

Import[URL["https://i.imgur.com/kcUcWnql.jpeg"]]
1ukmn97ui4o98

Here are get the vision model description of the mind-map above (and place the output in Markdown format):

mmDescr = LLMVisionSynthesize["How many branches this mind-map has? Describe each branch separately. Use relevant emoji prefixes.", "https://imgur.com/kcUcWnq.jpeg", "MaxTokens" -> 900]
This mind map has four primary branches, each diverging from a \
central node labeled "LLM functionalities." I will describe each one \
using relevant emoji prefixes:

1. 🖼️ **DALL-E** branch is in yellow and represents an access point to \
the DALL-E service, likely a reference to a Large Language Model \
(LLM) with image generation capabilities.

2. 🤖 **ChatGPT** branch in pink is associated with the ChatGPT \
service, suggesting it's a conversational LLM branch. There are two \
sub-branches:
   - **LLM prompts** indicates a focus on the prompts used to \
communicate with LLMs.
   - **Notebook-wide chats** suggests a feature or functionality for \
conducting chats across an entire notebook environment.

3. 💬 **LLM chat objects** branch in purple implies that there are \
objects specifically designed for chat interactions within LLM \
services.

4. ✍️ **LLM functions** branch in green seems to represent various \
functional aspects or capabilities of LLMs, with a sub-branch:
   - **Chatbooks** which may indicate a feature or tool related to \
managing or organizing chat conversations as books or records.

Converting descriptions to diagrams

Here from the obtained description we request a (new) Mermaid-JS diagram to be generated:

mmdChart = LLMSynthesize[{LLMPrompt["CodeWriter"], "Make the corresponding Mermaid-JS diagram code for the following description. Give the code only, without Markdown symbols.", mmDescr}]
graph TB
    center[LLM functionalities]
    center --> dalle[DALL-E]
    center --> chat[ChatGPT]
    center --> chatobj[LLM chat objects]
    center --> functions[LLM functions]
    chat --> prompts[LLM prompts]
    chat --> notebook[Notebook-wide chats]
    functions --> chatbooks[Chatbooks]

Here is a diagram made with the Mermaid-JS spec obtained above using the resource function of “MermaidInk”, [AAf1]:

ResourceFunction["MermaidInk"][mmdChart]
1qni2g4n8vywf

Below is given an instance of one of the better LLM results for making a Mermaid-JS diagram over the “vision-derived” mind-map description.

ResourceFunction["MermaidInk"]["
graph 
 TBA[LLM services access] --> B[DALL-E]
 A --> C[ChatGPT]
 A --> D[PaLM]
 A --> E[LLM chat objects]
 A --> F[Chatbooks]
 B -->|related to| G[DALL-E AI system]
 C -->|associated with| H[ChatGPT]
 D -->|related to| I[PaLM model]
 E -->|part of| J[chat-related objects/functionalities]
 F -->|implies| K[Feature or application related to chatbooks]
"]
0f0fuo9nexxl8

Code generation from image descriptions

Here is an example of code generation based on the “vision derived” mind-map description above:

LLMSynthesize[{LLMPrompt["CodeWriter"], "Generate the Mathematica code of a graph that corresponds to the description:\n", mmDescr}]
Graph[{"LLM services access" -> "DALL-E","LLM services access" -> "ChatGPT",
"LLM services access" -> "PaLM",
"LLM services access" -> "LLM functionalities",
"LLM services access" -> "Chatbooks","LLM services access" -> "Notebook-wide chats",
"LLM services access" -> "Direct access of LLM services","LLM functionalities" -> "LLM prompts",
"LLM functionalities" -> "LLM functions","LLM functionalities" -> "LLM chat objects"},
VertexLabels -> "Name"]
ToExpression[%]
0cmyq0lep1q7f

Analyzing graphical WL results

Consider another “serious” example – that of analyzing chess play positions. Here we get a chess position using the paclet “Chess”, [WRIp3]:

175o8ba3cxgoh
0scq7lbpp7xfs

Here we describe it with “AI vision”:

LLMVisionSynthesize["Describe the position.", Image[b2], "MaxTokens" -> 1000, "Temperature" -> 0.05]
This is a chess position from a game in progress. Here's the \
description of the position by algebraic notation for each piece:

White pieces:
- King (K) on c1
- Queen (Q) on e2
- Rooks (R) on h1 and a1
- Bishops (B) on e3 and f1
- Knights (N) on g4 and e2
- Pawns (P) on a2, b2, c4, d4, f2, g2, and h2

Black pieces:
- King (K) on e8
- Queen (Q) on e7
- Rooks (R) on h8 and a8
- Bishops (B) on f5 and g7
- Knights (N) on c6 and f6
- Pawns (P) on a7, b7, c7, d7, f7, g7, and h7

It's Black's turn to move. The position suggests an ongoing middle \
game with both sides having developed most of their pieces. White has \
castled queenside, while Black has not yet castled. The white knight \
on g4 is putting pressure on the black knight on f6 and the pawn on \
h7. The black bishop on f5 is active and could become a strong piece \
depending on the continuation of the game.

Remark: In our few experiments with these kind of image narrations, a fair amount of the individual pieces are described to be at wrong chessboard locations.

Remark: In order to make the AI vision more successful, we increased the size of the chessboard frame tick labels, and turned the “a÷h” ticks uppercase (into “A÷H” ticks.) It is interesting to compare the vision results over chess positions with and without that transformation.

LLM Functions

Let us show more programmatic utilization of the vision capabilities.

Here is the workflow we consider:

  1. Ingest an image file and encode it into a Base64 string
  2. Make an LLM configuration with that image string (and a suitable model)
  3. Synthesize a response to a basic request (like, image description)
    • Using LLMSynthesize
  4. Make an LLM function for asking different questions over image
    • Using LLMFunction
  5. Ask questions and verify results
    • ⚠️ Answers to “hard” numerical questions are often wrong.
    • It might be useful to get formatted outputs

Remark: The function LLMVisionSynthesize combines LLMSynthesize and step 2. The function LLMVisionFunction combines LLMFunction and step 2.

Image ingestion and encoding

Here we ingest an image and display it:

imgBarChart = Import[$HomeDirectory <> "/Downloads/Cyber-Week-Spending-Set-to-Hit-New-Highs-in-2023-small.jpeg"]
0iyello2xfyfo

Remark: The image was downloaded from the post “Cyber Week Spending Set to Hit New Highs in 2023” .

Configuration and synthesis

Here we synthesize a response of a image description request:

LLMVisionSynthesize["Describe the image.", imgBarChart, "MaxTokens" -> 600]
The image shows a bar chart infographic titled "Cyber Week Spending \
Set to Hit New Highs in 2023" with a subtitle "Estimated online \
spending on Thanksgiving weekend in the United States." There are \
bars for five years (2019, 2020, 2021, 2022, and 2023) across three \
significant shopping days: Thanksgiving Day, Black Friday, and Cyber \
Monday.

The bars represent the spending amounts, with different colors for \
each year. The spending for 2019 is shown in navy blue, 2020 in a \
lighter blue, 2021 in yellow, 2022 in darker yellow, and 2023 in dark \
yellow, with a pattern that clearly indicates the 2023 data is a \
forecast.

From the graph, one can observe an increasing trend in estimated \
online spending, with the forecast for 2023 being the highest across \
all three days. The graph also has an icon that represents online \
shopping, consisting of a computer monitor with a shopping tag.

At the bottom of the infographic, there is a note that says the \
data's source is Adobe Analytics. The image also contains the \
Statista logo, which indicates that this graphic might have been \
created or distributed by Statista, a company that specializes in \
market and consumer data. Additionally, there are Creative Commons \
(CC) icons, signifying the sharing and use permissions of the graphic.

It's important to note that without specific numbers, I cannot \
provide actual figures, but the visual trend is clear -- \
there is substantial year-over-year growth in online spending during \
these key shopping dates, culminating in a forecasted peak for 2023.

Repeated questioning

Here we define an LLM function that allows multiple question request invocations over the image:

fst = LLMVisionFunction["For the given image answer the question: ``. Be as concise as possible in your answers.", imgBarChart, "MaxTokens" -> 300]
0nmz56wwuboz3
fst["How many years are presented in that image?"]
"Five years are presented in the image."
fst["Which year has the highest value? What is that value?"]
"2023 has the highest value, which is approximately $11B on Cyber Monday."

Remark: Numerical value readings over technical plots or charts seem to be often wrong. Often enough, OpenAI’s vision model warns about this in the responses.

Formatted output

Here we make a function with a specially formatted output that can be more easily integrated in (larger) workflows:

fjs = LLMVisionFunction["How many `1` per `2`? " <> LLMPrompt["NothingElse"]["JSON"], imgBarChart, "MaxTokens" -> 300, "Temperature" -> 0.1]
032vcq74auyv9

Here we invoke that function (in order to get the money per year “seen” by OpenAI’s vision):

res = fjs["money", "shopping day"]
```json
{
  "Thanksgiving Day": {
    "2019": "$4B",
    "2020": "$5B",
    "2021": "$6B",
    "2022": "$7B",
    "2023": "$8B"
  },
  "Black Friday": {
    "2019": "$7B",
    "2020": "$9B",
    "2021": "$9B",
    "2022": "$10B",
    "2023": "$11B"
  },
  "Cyber Monday": {
    "2019": "$9B",
    "2020": "$11B",
    "2021": "$11B",
    "2022": "$12B",
    "2023": "$13B"
  }
}
```

Remark: The above result should be structured as shopping-day:year:value. But occasionally it might be structured as year::shopping-day::value. In the latter case just re-run LLM invocation.

Here we parse the obtained JSON into WL association structure:

aMoney = ImportString[StringReplace[res, {"```json" -> "", "```" -> ""}], "RawJSON"]
<|"Thanksgiving Day" -> <|"2019" -> "$4B", "2020" -> "$5B", 
   "2021" -> "$6B", "2022" -> "$7B", "2023" -> "$8B"|>, 
 "Black Friday" -> <|"2019" -> "$7B", "2020" -> "$9B", 
   "2021" -> "$9B", "2022" -> "$10B", "2023" -> "$11B"|>, 
 "Cyber Monday" -> <|"2019" -> "$9B", "2020" -> "$11B", 
   "2021" -> "$11B", "2022" -> "$12B", "2023" -> "$13B"|>|>

Remark: Currently LLMVisionFunction does not have an interpreter (or “form”) parameter as LLMFunction does. This can be seen as one of the reasons to include LLMVisionFunction in the “LLMFunctions” framework.

Here we convert the money strings into money quantities:

AbsoluteTiming[
  aMoney2 = Map[SemanticInterpretation, aMoney, {-1}] 
 ]
08ijuwuchj31q

Here is the corresponding bar chart and the original bar chart (for
comparison):

0rt43fezbbp4b
1lpfhko7c2g6e

Remark: The comparison shows “pretty good vision” by OpenAI! But, again, small (or maybe significant) discrepancies are observed.

Dedicated notebook cells

In the context of the “well-established” notebook solutions OpenAIMode, [AAp2], or Chatbook,
[WRIp2], we can contemplate extensions to integrate OpenAI’s vision service.

The main challenges here include determining how users will specify images in the notebook, such as through URLs, file names, or Base64 strings, each with unique considerations. Additionally, we have to explore how best to enable users to input prompts or requests for image processing by the AI/LLM service.

This integration, while valuable, it is not my immediate focus as there are programmatic ways to access OpenAI’s vision service already. (See the previous sections.)

Combinations (fairy tale generation)

Consider the following computational workflow for making fairy tales:

  1. Draw or LLM-generate a few images that characterize parts of a story.
  2. Narrate the images using the LLM “vision” functionality.
  3. Use an LLM to generate a story over the narrations.

Remark: Multi-modal LLM / AI systems already combine steps 2 and 3.

Remark: The workflow above (after it is programmed) can be executed multiple times until satisfactory results are obtained.

Here are image generations using DALL-E for four different requests with the same illustrator name in them:

storyImages = 
   Map[
    ImageSynthesize["Painting in the style of John Bauer of " <> #] &,
    {"a girl gets a basket with wine and food for her grandma.", 
     "a big bear meets a girl carrying a basket in the forest.", 
     "a girl that gives food from a basket to a big bear.", 
     "a big bear builds a new house for girl's grandma."} 
   ];
storyImages // Length

(*4*)

Here we display the images:

storyImages
13qqfe3pzqfn9

Here we get the image narrations (via the OpenAI’s “vision service”):

storyImagesDescriptions = LLMVisionSynthesize["Concisely describe the images.", storyImages, "MaxTokens" -> 600]
1. A painting of a woman in a traditional outfit reaching into a
    basket filled with vegetables and bread beside a bottle.
2. An illustration of a person in a cloak holding a bucket and
    standing next to a large bear in a forest.
3. An artwork depicting a person sitting naked by a birch tree,
    sharing a cake with a small bear.
4. A picture of a person in a folk costume sitting next to a bear
    with a ladder leaning against a house.

Here we extract the descriptions into a list:

descr = StringSplit[storyImagesDescriptions, "\n"];

Here we generate the story from the descriptions above (using OpenAI’s ChatGPT):

 LLMSynthesize[{"Write a story that fits the following four descriptions:", Sequence @@ descr}, LLMEvaluator -> LLMConfiguration["MaxTokens" -> 1200]]
In a small village nestled deep within a lush forest, lived a woman \
named Anya. She was gentle and kind-hearted, known for her artistic \
talent and love for nature. Anya had a keen eye for capturing the \
beauty of the world around her through her paintings. Each stroke of \
her brush seemed to hold a piece of her soul, and her art touched the \
hearts of all who laid their eyes upon it.

One sunny day, on the outskirts of the village, Anya set up her easel \
amidst a lively farmers' market. In front of her, she placed a large \
canvas, ready to bring her latest vision to life. With her palette \
filled with vibrant colors, she began painting a woman dressed in a \
traditional outfit, delicately reaching into a woven basket filled to \
the brim with fresh vegetables and warm bread. Beside the basket lay \
an empty bottle, hinting at a joyous feast anticipated for the day.

As Anya skillfully brought her painting to life, a cloak-wrapped \
figure caught her attention. Intrigued, she turned her easel slightly \
to capture the essence of this mysterious wanderer standing beside a \
mighty bear deep within the heart of the forest. In her illustration, \
she depicted the cloaked person, holding a bucket, their gaze met by \
the curious eyes of the regal woodland creature. The bond between \
them was palpable, a silent understanding as they stood together, \
guardians of the ancient woods.

Meanwhile, in a clearing not too far away, Anya discovered a scene \
that touched her deeply. She stumbled upon a person sitting naked \
beneath the shade of a majestic birch tree, a cake placed lovingly \
between them and a small bear. The artwork she created was a tender \
portrayal of the intimate connection shared by the two, a testament \
to the innate kindness that existed between species. Together, they \
enjoyed the sweet treat, their hearts entwined in empathy, neither \
fearing the vulnerability of their exposed selves.

Driven by her artistry, Anya's imagination continued to explore the \
fascinating relationship between humans and bears in her village. In \
her final artwork, she turned her focus to a person in a folk \
costume, sitting comfortably beside a towering bear. A ladder leaned \
against a charming wooden house in the background, illustrating the \
close bond shared between the village folks and their wild \
companions. Together, they stood tall, their spirits entwined in a \
balance of mutual respect and harmony.

As Anya showcased her artwork to the villagers, they were captivated \
by the depth of emotion expressed through her brushstrokes. Her \
paintings served as a reminder that love and understanding knew no \
boundaries, whether lived within the confines of villages or amidst \
the enchanting wilderness.

Anya became a celebrated artist, known far and wide for her ability \
to weave tales of compassion and unity through her exquisite \
paintings. Her work inspired generations to see the world through the \
lens of empathy, teaching them that even in unconventional \
connections between humans and animals, beauty could be found.

And so, her legacy lived on, her art continuing to touch the hearts \
of those who recognized the profound messages hidden within her \
strokes of color. For in every stroke, Anya immortalized the timeless \
bond between humanity and the natural world, forever reminding us of \
the kinship we share with the creatures that roam our earth.

Conclusions and leftover comments

  • The new OpenAI vision model, “gpt-4-vision-preview”, as all LLMs produces too much words, and it has to be reined in and restricted.
  • The functions LLMVisionSynthesize and LLMVisionFunction have to be part of the “LLMFunctions” framework.
    • For example, “LLMVision*” functions do not have an interpreter (or “form”) argument.
  • The package “LLMVision” is meant to be simple and direct, not covering all angles.
  • It would be nice a dedicated notebook cell interface and workflow(s) for interacting with “AI vision” services to be designed and implemented.
    • The main challenge is the input of images.
  • Generating code from hand-written diagrams might be really effective demo using WL.
  • It would be interesting to apply the “AI vision” functionalities over displays from, say, chess or play-cards paclets.

References

Articles

[AA1] Anton Antonov, “Workflows with LLM functions (in WL)”,​ August 4, (2023), Wolfram Community, STAFF PICKS.

[AA2] Anton Antonov, “Raku, Python, and Wolfram Language over LLM functionalities”, (2023), Wolfram Community.

[AA3] Anton Antonov, “AI vision via Raku”, (2023), Wolfram Community.

[MT1] Marco Thiel, “Direct API access to new features of GPT-4 (including vision, DALL-E, and TTS)​​”, November 8, (2023), Wolfram Community, STAFF PICKS.

[OAIb1] OpenAI team, “New models and developer products announced at DevDay” , (2023), OpenAI/blog .

Functions, packages, and paclets

[AAf1] Anton Antonov, MermaidInk, WL function, (2023), Wolfram Function Repository.

[AAp1] Anton Antonov, LLMVision.m, Mathematica package, (2023), GitHub/antononcube .

[AAp2] Anton Antonov, OpenAIMode, WL paclet, (2023), Wolfram Language Paclet Repository.

[AAp3] Anton Antonov, OpenAIRequest.m, Mathematica package, (2023), GitHub/antononcube .

[CWp1] Christopher Wolfram, OpenAILink, WL paclet, (2023), Wolfram Language Paclet Repository.

[WRIp1] Wolfram Research, Inc., LLMFunctions, WL paclet, (2023), Wolfram Language Paclet Repository.

[WRIp2] Wolfram Research, Inc., Chatbook, WL paclet, (2023), Wolfram Language Paclet Repository.

[WRIp3] Wolfram Research, Inc., Chess, WL paclet, (2023), Wolfram Language Paclet Repository.

Videos

[AAv1] Anton Antonov, “OpenAIMode demo (Mathematica)”, (2023), YouTube/@AAA4Prediction.

Nightcore “Conflict” video making

Introduction

This notebook shows how to make Nightcore modifications to the animation video, “Conflict” (1983), Soyuzmultfilm.

Remark: In Russian: “Конфликт”, (1983), Союзмультфилм .

Remark: We use “Conflict” since its licencing allows copies of it to be (publicly) played via YouTube.

Remark: The notebook follows closely a previous post of mine about making Nightcore version of the song “Schweine”.

The Nightcore transformation of the video was fairly straightforward with Mathematica / WL. The video transformation and combination are also fairly straightforward or easy.

Remark: Here is the final result uploaded to YouTube: https://youtu.be/C2TtkKfQa9I

Get movies

Here are links to that video:

I downloaded the videos from after searching yandex.ru (dzen.ru). Alternatively, one can find and download videos in Firefox or Google Chrome via relevant plugins. (Or use VLC; or utilize the paclet described in the post “Playing with YouTube from Mathematica”, [BMI1].)

At this point I have a small official video and larger one. This gives the opportunity to demonstrate transferring of the “Dolphin” signature from the “official” video to the larger one. (See the frame manipulation below.)

Here we import the downloaded video:

vdConflict0 = Import["~/Downloads/Conflict-Soviet-Animation.mp4"]

Make Nightcore audio

The process for making a song to be in the Nightcore style is described in Wikipedia, [Wk1]. Basically, we just make the tempo 20-30% faster and raise the pitch with, $\approx 5.5$ semitones.

Remark: An alternative of the process shown in this section is to use audio transformation programs like Audacity and AmadeusPro.

Here we get the audio from the video:

auConflict = Audio[vdConflict0]

Here we change the tempo to be 20% faster:

AbsoluteTiming[ auConflictFaster = AudioTimeStretch[auConflict, 1/1.2] ]

Here we raise the pitch with $5.5$ semitones:

AbsoluteTiming[ auConflictNightcore = AudioPitchShift[auConflictFaster, Quantity[5.5, "Semitones"]] ]

Direct video styling

If we only wanted to change how the video looks we can directly manipulate the video frames with VideoFrameMap, [WRI6] :

AbsoluteTiming[ k = 0; vdConflict4 = VideoFrameMap[ImageEffect[#, "Tritanopia"] &, vdConflict0]; ] (*{75.6817, Null}*)

vdConflict4

Remark: Since we want to make both the audio and video shorter we have to use video frames.

Make Nightcore video

Get the frames of the video:

AbsoluteTiming[ lsFrames = VideoExtractFrames[vdConflict0, All]; ] (*{2.65153, Null}*)

Show the number of frames:

Length[lsFrames] (*10730*)

Generate (audio-less) video from the list of frames that have the same length as the generated audio:

AbsoluteTiming[ vdConflictNew = VideoGenerator[lsFrames, Duration[auConflictNightcore]]; ] (*{56.1004, Null}*)

Combine the video and audio (into a new video):

AbsoluteTiming[ vdConflictNightcore = VideoCombine[{vdConflictNew, auConflictNightcore}]; ] (*{0.144603, Null}*)

Here is the result:

vdConflictNightcore

Remark: Here we do not export the video, since Mathematica saves it in a “standard” location of the host operating system.

Cutting-off and re-splicing the movie credits

In order to engage better people from the Millennials and Gen Z generational cohorts, I want to move the movie credits from the start of the movie to be at the end. We use the function VideoSplit, [WRI10], and VideoJoin, [WRI11].

Here we show frames that indicate where to split the obtained Nightcore movie:

VideoExtractFrames[vdConflictNightcore, {1, 30, 36, 37, 38}]

Here we split the video:

{v1, v2} = VideoSplit[vdConflictNightcore, 37];

In order to have a better visual flow we color-invert the frames of the credits part:

v1Negative = VideoFrameMap[ColorNegate, v1];

Here we splice the “main” part with the “negated” credits part:

vdConflictNightcore2 = VideoJoin[v2, v1Negative]

References

[BMA1] b3m2ma1, “Playing with YouTube from Mathematica”, (2018), Wolfram Community. (GitHub link.)

[Wk1] Wikipedia entry, “Nightcore”.

[WRI1] Wolfram Research (2010), TextRecognize, Wolfram Language function, https://reference.wolfram.com/language/ref/TextRecognize.html (updated 2020).

[WRI2] Wolfram Research (2016), Audio, Wolfram Language function, https://reference.wolfram.com/language/ref/Audio.html (updated 2020).

[WRI3] Wolfram Research (2016), AudioTimeStretch, Wolfram Language function, https://reference.wolfram.com/language/ref/AudioTimeStretch.html (updated 2020).

[WRI4] Wolfram Research (2016), AudioPitchShift, Wolfram Language function, https://reference.wolfram.com/language/ref/AudioPitchShift.html (updated 2020).

[WRI5] Wolfram Research (2020), VideoExtractFrames, Wolfram Language function, https://reference.wolfram.com/language/ref/VideoExtractFrames.html.

[WRI6] Wolfram Research (2020), VideoFrameMap, Wolfram Language function, https://reference.wolfram.com/language/ref/VideoFrameMap.html (updated 2021).

[WRI7] Wolfram Research (2008), ImageEffect, Wolfram Language function, https://reference.wolfram.com/language/ref/ImageEffect.html (updated 13).

[WRI8] Wolfram Research (2020), VideoGenerator, Wolfram Language function, https://reference.wolfram.com/language/ref/VideoGenerator.html (updated 2021).

[WRI9] Wolfram Research (2020), VideoCombine, Wolfram Language function, https://reference.wolfram.com/language/ref/VideoCombine.html.

[WRI10] Wolfram Research (2020), VideoSplit, Wolfram Language function, https://reference.wolfram.com/language/ref/VideoSplit.html.

[WRI11] Wolfram Research (2020), VideoJoin, Wolfram Language function, https://reference.wolfram.com/language/ref/VideoJoin.html.

Wolfram Language conference in St. Petersburg

Two weeks ago (June 1st and 2nd) I participated in the Wolfram Language conference in St. Petersburg, Russia.
Here are the corresponding announcements:

The conference was co-organized by Kirill Belov and Petr Genadievich Tenishev.

Link to the GitHub repository with my conference presentation materials.

Here is a mind-map of the potential presentations Kirill and I discussed:

System dynamics presentation

I presented “Динамические системы : Расширение и улучшение эпидемиологических моделей”
(in English: “Dynamics systems: extending and improving epidemiological models”.)

The main presentation slides had a dozen supplements:

Making two presentations

Interestingly, I first prepared a Latent Semantic Analysis (LSA) talk, but then found out that the organizers listed another talk I discussed with them, on extending dynamic systems models. (The latter one is the first we discussed, so, it was my “fault” that I wanted to talk about LSA.)

Here are the presentation notebooks for LSA in English and Russian .

Some afterthoughts

  • Тhe conference was very “strong”, my presentation was the “weakest.”
    • With “strong” I refer to the content and style of the presentations.
  • This was also the first scientific presentation I gave in Russian. I also got a participation diploma .

to demonstrate generation of epidemiological modeling code.

  • Preparing for the conference reminded me of some the COVID-19 modeling hackathons I participated in.
  • I prepared the initial models of artillery shells manufacturing, but much more work has to be done in order to have a meaningful article or presentation. (Hopefully, I am finishing that soon.)

References

Articles, posts, presentations

[AA1] Антон Антонов,
“Динамические системы : Расширение и улучшение эпидемиологических моделей” .

[AA2] Антон Антонов,
“COVID-19 modeling over Botswana” ,

[AA3] Anton Antonov,
“WirVsVirus 2020 hackathon participation” ,
(2020),
MathematicaForPrediction at WordPress .

Quantile regression 3D examples

Introduction

In this notebook we develop in detail Quantile Regression (QR) examples over 3D data via the functions of the paclet “AntonAntonov/QuantileRegression”, [AAp1].

The QR examples demonstrate using:

  1. QuantileRegression with “automatic”, NURBS functions (created via BSplineFunction.)
  1. QuantileRegressionFit with custom made basis functions

Remark: In order to get a better idea of the how the data looks like, use the 3D graphics interactivity feature rotation.

Remark: This notebook automatically installs the paclet “AntonAntonov/QuantileRegression”, [AAp1] — see the section “Preparation” below.

Remark: A version of this notebook is a technical note in the paclet “AntonAntonov/QuantileRegression” , [AAp1].

0jsvdcl9qkyre


First neat example

This section has a first neat example with data with triangular domain.

Generate noisy 3D data:


Block[{c = 2, h = 0.1}, 
  data = Flatten[Table[{x, y, Exp[-(x^2 + y^2)/4]*(1 + RandomReal[1.2])}, {x, -c, c, h}, {y, x, c, h}], 1]; 
 ]

Compute Quantile regression for probabilities 0.1 and 0.9 :


probs = {0.1, 0.9};
AbsoluteTiming[
  funcs = AssociationThread[probs -> QuantileRegression[data, 4, probs]]; 
 ]

(*{0.205853, Null}*)

Plot the data points and regression quantiles together:


reg = ConvexHullRegion[Most /@ data];
QRPlot3D[data, funcs, RegionFunction -> Function[{x, y}, RegionMember[reg, {x, y}]]]

0v91aa1kds5qd


Noisy arrow wave

Generate random, “noisy wave” data:


{b, c} = {-6, 6};
data = RandomReal[{b, c}, {1200, 2}];
data = Map[Append[#, Sqrt[#[[1]] - b] + Sin[#[[1]] + Abs[#[[2]]]] + RandomVariate[NormalDistribution[0, 0.3]]] &, data];
Dimensions[data]

(*{1200, 3}*)

3D list plot of the data:


ListPointPlot3D[data, PlotRange -> All, PlotLabel -> "Noisy wave data", BoxRatios -> {1, 1, 2/3}, ImageSize -> Medium]

02j0iws4gln7f

Data summary:


ResourceFunction["RecordsSummary"][data]

0a1smh8l7wt2l

Compute Quantile regression for probability 0.5 using a grid of 7*4 NURBS basis functions:


AbsoluteTiming[
  funcs = QuantileRegression[data, {7, 4}, 0.5]; 
 ]

(*{0.379605, Null}*)

Plot the obtained function and data:


QRPlot3D[data, <|0.5 -> First[funcs]|>]

1f8t1q0hl5h41

Quantile regression for probabilities 0.1 and 0.9:


probs = {0.1, 0.9};
AbsoluteTiming[
  funcs = AssociationThread[probs, QuantileRegression[data, {7, 4}, probs]]; 
 ]

(*{0.591367, Null}*)

3D list plot of the data:


QRPlot3D[data, funcs]

0cv8341ro0uh9

Count the number of points under each surface:


sepPoints = Map[Function[{f}, Length@Select[data, #[[-1]] < First[Apply[f, Most[#]]] &]], funcs]

(*<|0.1 -> 120, 0.9 -> 1087|>*)

Show the corresponding fractions (should correspond to the probabilities):


sepFractions = N[sepPoints/Length[data]]

(*<|0.1 -> 0.1, 0.9 -> 0.905833|>*)

Square sombrero

In this section we show the use of QuantileRegressionFit over a pre-generated basis functions.

Remark: The QR computational steps below correspond to the implementation of QuantileRegression .

Generate random, “square sombrero” data:


{b, c} = {-6, 6};
data = RandomReal[{b, c}, {1200, 2}];
data = Map[Append[#, Exp[-# . #/(c - b)/2] (Sin[Abs[#[[1]]] + Abs[#[[2]]]] + RandomVariate[NormalDistribution[0, 0.2]])] &, data];
Dimensions[data]

(*{1200, 3}*)

3D list plot of the data:


ListPointPlot3D[data, PlotRange -> All, PlotLabel -> "Square sombrero data", BoxRatios -> {1, 1, 1/1.5}, ImageSize -> Medium]

05prs9945g8ut

Data summary:


ResourceFunction["RecordsSummary"][data]

01uldvdrnv1ms

NURBS basis of 12*12 functions:


basis = NURBSBasis[data[[All, 1 ;; 2]], 12];
Length[basis]

(*144*)

Quantile regression for probability 0.9:


probs = {0.9};
AbsoluteTiming[
  funcs = AssociationThread[probs, QuantileRegressionFit[data, Through[Values[basis][x, y]], {x, y}, probs]]; 
 ]

1nfo6woxheuyi


(*{6.53867, Null}*)

Plot functions and data:


QRPlot3D[data, ToPureFunctions[funcs, {x, y}], ColorFunction -> (Lighter[Blue] &), PlotLegends -> SwatchLegend[{Lighter[Blue]}, Keys[funcs]], Exclusions -> None]

0r0hf9eso48k0


Pyramid basis

In this section we demonstrate the use of custom made basis functions.

Define a pyramid basis function:

07fp09l6v901b

Here is a plot of a basis function:


Plot3D[PyramidBasisFunc[{0, 0}, {x, y}], {x, -1.5, 1.5}, {y, -1.5, 1.5}, PlotRange -> All, ImageSize -> Medium]

0u466o4h1w930

Make a basis for the sombrero data:


basis = Flatten@Table[PyramidBasisFunc[{i, j}, {x, y}], {i, b, c}, {j, b, c}];
Length[basis]

(*169*)

Find regression quantiles for probability 0.2:


probs = {0.2};
AbsoluteTiming[
  funcs = 
    AssociationThread[
     probs, QuantileRegressionFit[data, basis, {x, y}, probs, Method -> {LinearProgramming, Method -> "InteriorPoint"}]]; 
 ]

(*{0.866452, Null}*)

Plot data and regression quantiles together:


QRPlot3D[data, ToPureFunctions[funcs], ColorFunction -> (Lighter[Blue] &), Mesh -> True, PlotLegends -> SwatchLegend[{Lighter[Blue]}, Keys[funcs]], Exclusions -> None]

0d53u1xiop4c9


Partial sombrero

In this section we demonstrate the built-in basis filtering in the function NURBSBasis . The basis filtering is used to alleviate (or diminish) fitting problems for data that partially occupies the functional basis domain.

Remark: For a more detailed discussion of how basis filtering is implemented and how it addresses “partial data occupation” problems see the section “Possible issues” of the function page for NURBSBasis .

Generate random, “partial sombrero” data:


{b, c} = {-6, 6};
data = RandomReal[{b, c}, {1600, 2}];
sombreroFunc = Exp[-# . #/(c - b)/4]*Sin[Sqrt[#[[1]]^2 + #[[2]]^2]] &;
data = Map[Append[#, sombreroFunc[##]*(1 + RandomVariate[NormalDistribution[0, 0.6]])] &, data];
Dimensions[data]

(*{1600, 3}*)

3D list plot of the data:


data2 = Select[data, #[[1]] <= 0.5*#[[2]] &];
ListPointPlot3D[data2, PlotLabel -> "Partial sombrero data", BoxRatios -> {1, 1, 2/3}, ImageSize -> Medium]

1tabu951donl8

Regression quantiles:


probs = {0.1, 0.9};
AbsoluteTiming[
  funcs = AssociationThread[probs, QuantileRegression[data2, 5, probs]]; 
 ]

(*{0.295488, Null}*)

Plot data and regression quantiles together:


QRPlot3D[data2, funcs]

15k2lwvoyo9jx

Create a region object for the convex hull of the data points:


reg = ConvexHullRegion[data2[[All, 1 ;; 2]]]

0e0do4t5knu03

The plot data and regression quantiles over the region above:


QRPlot3D[data2, funcs, RegionFunction -> Function[{x, y}, RegionMember[reg, {x, y}]]]

0eqieqqzjjm8y

Count the number of points under each surface:


sepPoints = Map[Function[{f}, Length[Select[data2, #[[-1]] < (f @@ Most[#])[[1]] &]]], funcs]

(*<|0.1 -> 91, 0.9 -> 731|>*)

Show the corresponding fractions (should correspond to the probabilities):


sepFractions = N[sepPoints/Length[data2]]

(*<|0.1 -> 0.112485, 0.9 -> 0.903585|>*)

Preparation

Install the paclet:


PacletInstall["AntonAntonov/QuantileRegression"]

Load the Quantile regression paclet:


Needs["AntonAntonov`QuantileRegression`"]

Set random seed:


SeedRandom[9903];

Define plot function:


QRPlot3D[data_List, funcs_Association, opts___] := 
   Show[
    ListPointPlot3D[data, FilterRules[{opts}, {{BoxRatios -> {1, 1, 1/1.5}}}], {BoxRatios -> {1, 1, 1/1.5}}, PlotStyle -> Red, PlotRange -> All], 
    Plot3D[Evaluate@Through[Values[funcs][x, y]], {x, Min[data[[All, 1]]], Max[data[[All, 1]]]}, {y, Min[data[[All, 2]]], Max[data[[All, 2]]]}, 
     opts, 
     PlotRange -> All, PlotStyle -> {Opacity[0.7]}, Mesh -> True, PlotTheme -> "LightMesh", PerformanceGoal -> "Quality", PlotLegends -> Keys[funcs]], ImageSize -> Medium];

Define pure functions converter:


ToPureFunctions[funcs_, vars_List : {x, y}] := 
   Map[With[{f = #}, f &] &, ReplaceAll[funcs, Thread[vars -> Map[Slot, Range[Length[vars]]]]]];

References

Articles

[Wk1] Wikipedia entry, Quantile regression.

[Wk2] Wikipedia entry, NURBS.

[AA1] Anton Antonov, “Quantile regression through linear programming”, (2013), MathematicaForPrediction at WordPress.

[AA2] Anton Antonov, “Quantile regression with B-splines”, (2014), MathematicaForPrediction at WordPress.

Books

Roger Koenker, (2005). *Quantile Regression* (Econometric Society Monographs). 2005. Cambridge: Cambridge University Press. doi:10.1017/CBO9780511754098

Functions, packages, paclets

[AAf1] Anton Antonov, QuantileRegression, (2019), Wolfram Function Repository.

[AAp1] Anton Antonov, QuantileRegression paclet, (2023), Wolfram Language Paclet Repository.

[AAp2] Anton Antonov, QuantileRegression Mathematica package, (2013-2023), MathematicaForPrediction at GitHub.

Videos

[AAv1] Anton Antonov, “Quantile Regression—Theory, Implementations, and Applications”, (2014), Wolfram channel at YouTube.

OpenAIMode (notebook style)

This blog post has the “slides” of the presentation “OpenAIMode demo” in which is demonstrated creation and evaluation of OpenAI interaction cells in Mathematica notebooks. (Via a special notebook style.)


Setup

  • It is assumed that the paclet OpenAILink is installed
    • … and the required setup steps are completed.
  • Install the paclet OpenAIMode
PacletInstall["AntonAntonov/OpenAIMode"]
Needs["AntonAntonov`OpenAIMode`"]

Demo

Let us show how the notebook style works:

  • Needs
  • OpenAIMode
  • Text completion cell (shortcut: “Shift-|”)
  • Tweak invocation parameters with SetOptions
  • Image generation cell (shortcuts: “Tab”)

Screenshots


How does it work?

Consider the following flowchart:


Concluding remarks

Similar work

Future plans (…maybe)

More documentation

Should this notebook style functions be part of OpenAILink?

Based on feedback:

  • Better default options
  • Additional OpenAI cells

Using Wolfram Engine in Raku sessions

I made today the presentation “Using Wolfram Engine in Raku sessions”:

enter image description here

The linked video demonstrates how we can do non-trivial mathematical computations in Raku sessions using Wolfram Engine.

The Raku package “Proc::ZMQed” is used.

Here are links to:

Trie based classifiers evaluation

Introduction

In this notebook we show how to evaluate Machine Learning (ML) classifiers based on Tries with frequencies, [AA1, AA2, AAp1], created over a well known ML dataset. The computations are done with packages and functions from the Wolfram Language (WL) ecosystem.

The classifiers based on Tries with frequencies can be seen as generalized Naive Bayesian Classifiers (NBCs).

We use the workflow summarized in this flowchart:

Import["https://raw.githubusercontent.com/antononcube/MathematicaForPrediction/master/MarkdownDocuments/Diagrams/A-monad-for-classification-workflows/Classification-workflow-horizontal-layout.jpg"]

For more details on classification workflows see the article “A monad for classification workflows”, [AA3].

Remark: This notebook is the Mathematica counterpart of the Raku computable Markdown document with the same name [AA7, AA6].

Remark: Mathematica and WL are used as synonyms in this notebook.


Data

In this section we obtain a dataset to make classification experiments with.

Through the Wolfram Function Repository (WFR) function ExampleDataset we can get data for the Titanic ship wreck:

dsTitanic0 = ResourceFunction["ExampleDataset"][{"MachineLearning", "Titanic"}];
dsTitanic0[[1 ;; 4]]

Remark: ExampleDataset uses ExampleData. Datasets from the ExampleData’s “MachineLearning” and “Statistics” collections are processed in order to obtain Dataset objects.

Instead of using the built-in Titanic data we use a version of it (which is used in Mathematica-vs-R comparisons, [AAr1]):

dsTitanic[[1 ;; 4]]

Here is a summary of the data:

ResourceFunction["RecordsSummary"][dsTitanic]


Make tries

In this section for demonstration purposes let us create a shorter trie and display it in tree form.

Here we drop the identifier column and take the record fields in a particular order, in which “passengerSurvival” is the last field:

lsRecords = Normal@dsTitanic[All, Prepend[KeyDrop[#, "id"], "passengerAge" -> ToString[#passengerAge]] &][All, {"passengerClass", "passengerSex", "passengerAge", "passengerSurvival"}][Values];

Here is a sample:

RandomSample[lsRecords, 3]

(*{{"3rd", "female", "-1", "died"}, {"1st", "female", "50", "survived"}, {"3rd", "male", "30", "died"}}*)

Here make a trie without the field “passengerAge”:

trTitanic = TrieCreate[lsRecords[[All, {1, 2, 4}]]];
TrieForm[trTitanic, AspectRatio -> 1/4, ImageSize -> 900]

Here is a corresponding mosaic plot, [AA4, AAp3]:

MosaicPlot[lsRecords[[All, {1, 2, 4}]]]

Remark: The function MosaicPlot uses tries with frequencies in its implementation. Observing and reasoning with mosaic plots should make it clear that tries with frequencies are (some sort of) generalized Naive Bayesian classifiers.


Trie classifier

In this section we create a Trie-based classifier.

In order to make certain reproducibility statements for the kind of experiments shown here, we use random seeding (with SeedRandom) before any computations that use pseudo-random numbers. Meaning, one would expect WL code that starts with a SeedRandom statement (e.g. SeedRandom[89]) to produce the same pseudo random numbers if it is executed multiple times (without changing it.)

SeedRandom[12];

Here we split the data into training and testing data in a stratified manner (a split for each label):

aSplit1 = GroupBy[lsRecords, #[[-1]] &, AssociationThread[{"training", "testing"}, TakeDrop[RandomSample[#], Round[0.75*Length[#]]]] &];
Map[Length, aSplit1, {2}]

(*<|"survived" -> <|"training" -> 375, "testing" -> 125|>, "died" -> <|"training" -> 607, "testing" -> 202|>|>*)

Here we aggregate training and testing data (and show the corresponding sizes):

aSplit2 = <|
    "training" -> Join @@ Map[#training &, aSplit1], 
    "testing" -> Join @@ Map[#testing &, aSplit1]|>;
Length /@ aSplit2

(*<|"training" -> 982, "testing" -> 327|>*)

Here we make a trie with the training data (and show the node counts):

trTitanic = TrieNodeProbabilities[TrieCreate[aSplit2["training"]]];
TrieNodeCounts[trTitanic]

(*<|"total" -> 142, "internal" -> 60, "leaves" -> 82|>*)

Here is the trie in tree form:

Here is an example decision-classification:

TrieClassify[trTitanic, {"1st", "female"}]

(*"survived"*)

Here is an example probabilities-classification:

TrieClassify[trTitanic, {"1st", "female"}, "Probabilities"]

(*<|"survived" -> 0.962264, "died" -> 0.0377358|>*)

We want to classify across all testing data, but not all testing data-records might be present in the trie. Let us check that such testing records are few (or none):

Tally[Map[TrieKeyExistsQ[trTitanic, #] &, aSplit2["testing"]]]

(*{{True, 321}, {False, 6}}*)

Let us remove the records that cannot be classified:

lsTesting = Pick[aSplit2["testing"], Map[TrieKeyExistsQ[trTitanic, #] &, aSplit2["testing"]]];
Length[lsTesting]

(*321*)

Here we classify all testing records and show a sample of the obtained actual-predicted pairs:

lsClassRes = {Last[#], TrieClassify[trTitanic, Most[#]]} & /@ lsTesting;
RandomSample[lsClassRes, 6]

(*{{"survived", "survived"}, {"died", "survived"}, {"died", "died"}, {"survived", "survived"}, {"survived", "died"}, {"survived", "survived"}}*)

Here we cross tabulate the actual vs predicted labels using WFR’s CrossTabulate:

ResourceFunction["CrossTabulate"][lsClassRes]

The cross-tabulation results look bad because the default decision threshold is used. We get better results by selecting a decision threshold via Receiver Operating Characteristic (ROC) plots.


Trie classification with ROC plots

In this section we systematically evaluate the Trie-based classifier using the Receiver Operating Characteristic (ROC) framework.

Here we classify all testing data records. For each record:

  • Get probabilities association
  • Add to that association the actual label
  • Make sure the association has both survival labels
lsClassRes = Map[Join[<|"survived" -> 0, "died" -> 0, "actual" -> #[[-1]]|>, TrieClassify[trTitanic, #[[1 ;; -2]], "Probabilities"]] &, lsTesting];

Here we make a ROC record, [AA5, AAp4]:

ToROCAssociation[{"survived", "died"}, #actual & /@ lsClassRes, Map[If[#survived >= 0.5, "survived", "died"] &, lsClassRes]]

(*<|"TruePositive" -> 71, "FalsePositive" -> 14, "TrueNegative" -> 184, "FalseNegative" -> 52|>*)

Here we obtain the range of the label “survived”:

lsVals = Map[#survived &, lsClassRes];
MinMax[lsVals]

(*{0, 1.}*)

Here we make list of decision thresholds:

In the following code cell for each threshold:

  • For each classification association decide on “survived” if the corresponding value is greater or equal to the threshold
  • Make threshold’s ROC-association
lsROCs = Table[
    ToROCAssociation[{"survived", "died"}, #actual & /@ lsClassRes, Map[If[#survived >= th, "survived", "died"] &, lsClassRes]], 
    {th, lsThresholds}];

Here is the obtained ROCs dataset:

Dataset[MapThread[Prepend[#1, "Threshold" -> #2] &, {lsROCs, lsThresholds}]]

Here is the corresponding ROC plot:

ROCPlot["FPR", "TPR", lsThresholds, lsROCs, GridLines -> Automatic, ImageSize -> Large]

We can see the Trie-based classifier has reasonable prediction abilities – we get ≈ 80% True Positive Rate (TPR) for a relatively small False Positive Rate (FPR), ≈ 20%.


Confusion matrices

Using ClassifierMeasurements we can produce the corresponding confusion matrix plots (using “made on the spot” Manipulate interface):

DynamicModule[{lsThresholds = lsThresholds, lsClassRes = lsClassRes, lsClassRes2}, 
  Manipulate[
   lsClassRes2 = Map[{#actual, If[#survived >= lsThresholds[[i]], "survived", "died"]} &, lsClassRes]; 
   Append[DeleteCases[ClassifierMeasurements[lsClassRes2[[All, 1]], lsClassRes2[[All, 2]], "ConfusionMatrixPlot"], ImageSize -> _], ImageSize -> Medium], 
   {{i, Flatten[Position[lsThresholds, Nearest[lsThresholds, 0.3][[1]]]][[1]], "index:"}, 1, Length[lsThresholds], 1, Appearance -> "Open"}, 
   {{normalizeQ, False, "normalize?:"}, {False, True}} 
  ] 
 ]


References

Articles

[AA1] Anton Antonov, “Tries with frequencies for data mining”, (2013), MathematicaForPrediction at WordPress.

[AA2] Anton Antonov, “Tries with frequencies in Java”, (2017), MathematicaForPrediction at WordPress.

[AA3] Anton Antonov, “A monad for classification workflows”, (2018), MathematicaForPrediction at WordPress.

[AA4] Anton Antonov, “Mosaic plots for data visualization”, (2014), MathematicaForPrediction at WordPress.

[AA5] Anton Antonov, “Basic example of using ROC with Linear regression”, (2016), MathematicaForPrediction at WordPress.

[AA6] Anton Antonov, “Trie based classifiers evaluation”, (2022), RakuForPrediction-book at GitHub/antononcube.

[AA7] Anton Antonov, “Trie based classifiers evaluation”, (2022), RakuForPrediction at WordPress.

Packages

[AAp1] Anton Antonov, TriesWithFrequencies Mathematica package, (2014-2022), MathematicaForPrediction at GitHub/antononcube.

[AAp2] Anton Antonov, ROCFunctions Mathematica package, (2016), MathematicaForPrediction at GitHub/antononcube.

[AAp3] Anton Antonov, MosaicPlot Mathematica package, (2014), MathematicaForPrediction at GitHub/antononcube.

Repositories

[AAr1] Anton Antonov, Mathematica vs. R project, (2018-2022), GitHub/antononcube.


Setup

Import["https://raw.githubusercontent.com/antononcube/MathematicaForPrediction/master/TriesWithFrequencies.m"];
Import["https://raw.githubusercontent.com/antononcube/MathematicaForPrediction/master/ROCFunctions.m"];
Import["https://raw.githubusercontent.com/antononcube/MathematicaForPrediction/master/MosaicPlot.m"];
dsTitanic = Import["https://raw.githubusercontent.com/antononcube/MathematicaVsR/master/Data/MathematicaVsR-Data-Titanic.csv", "Dataset", HeaderLines -> 1];

Re-exploring the structure of Chinese character images

Introduction

In this notebook we show information retrieval and clustering
techniques over images of Unicode collection of Chinese characters. Here
is the outline of notebook’s exposition:

  1. Get Chinese character images.
  2. Cluster “image vectors” and demonstrate that the obtained
    clusters have certain explainability elements.
  3. Apply Latent Semantic Analysis (LSA) workflow to the character
    set.
  4. Show visual thesaurus through a recommender system. (That uses
    Cosine similarity.)
  5. Discuss graph and hierarchical clustering using LSA matrix
    factors.
  6. Demonstrate approximation of “unseen” character images with an
    image basis obtained through LSA over a small set of (simple)
    images.
  7. Redo character approximation with more “interpretable” image
    basis.

Remark: This notebook started as an (extended)
comment for the Community discussion “Exploring
structure of Chinese characters through image processing”
, [SH1].
(Hence the title.)

Get Chinese character images

This code is a copy of the code in the original
Community post by Silvia Hao
, [SH1]:

0zu4hv95x0jjf
Module[{fsize = 50, width = 64, height = 64}, 
  lsCharIDs = Map[FromCharacterCode[#, "Unicode"] &, 16^^4E00 - 1 + Range[width height]]; 
 ]
charPage = Module[{fsize = 50, width = 64, height = 64}, 
    16^^4E00 - 1 + Range[width height] // pipe[
      FromCharacterCode[#, "Unicode"] & 
      , Characters, Partition[#, width] & 
      , Grid[#, Background -> Black, Spacings -> {0, 0}, ItemSize -> {1.5, 1.2}, Alignment -> {Center, Center}, Frame -> All, FrameStyle -> Directive[Red, AbsoluteThickness[3 \[Lambda]]]] & 
      , Style[#, White, fsize, FontFamily -> "Source Han Sans CN", FontWeight -> "ExtraLight"] & 
      , Rasterize[#, Background -> Black] & 
     ] 
   ];
chargrid = charPage // ColorDistance[#, Red] & // Image[#, "Byte"] & // Sign //Erosion[#, 5] &;
lmat = chargrid // MorphologicalComponents[#, Method -> "BoundingBox", CornerNeighbors -> False] &;
chars = ComponentMeasurements[{charPage // ColorConvert[#, "Grayscale"] &, lmat}, "MaskedImage", #Width > 10 &] // Values // Map@RemoveAlphaChannel;
chars = Module[{size = chars // Map@ImageDimensions // Max}, ImageCrop[#, {size, size}] & /@ chars];

Here is a sample of the obtained images:

SeedRandom[33];
RandomSample[chars, 5]
1jy9voh5c01lt

Vector representation of
images

Define a function that represents an image into a linear vector space
(of pixels):

Clear[ImageToVector];
ImageToVector[img_Image] := Flatten[ImageData[ColorConvert[img, "Grayscale"]]];
ImageToVector[img_Image, imgSize_] := Flatten[ImageData[ColorConvert[ImageResize[img, imgSize], "Grayscale"]]];
ImageToVector[___] := $Failed;

Show how vector represented images look like:

Table[BlockRandom[
   img = RandomChoice[chars]; 
   ListPlot[ImageToVector[img], Filling -> Axis, PlotRange -> All, PlotLabel -> img, ImageSize -> Medium, AspectRatio -> 1/6], 
   RandomSeeding -> rs], {rs, {33, 998}}]
0cobk7b0m9xcn
\[AliasDelimiter]

Data preparation

In this section we represent the images into a linear vector space.
(In which each pixel is a basis vector.)

Make an association with images:

aCImages = AssociationThread[lsCharIDs -> chars];
Length[aCImages]

(*4096*)

Make flat vectors with the images:

AbsoluteTiming[
  aCImageVecs = ParallelMap[ImageToVector, aCImages]; 
 ]

(*{0.998162, Null}*)

Do matrix plots a random sample of the image vectors:

SeedRandom[32];
MatrixPlot[Partition[#, ImageDimensions[aCImages[[1]]][[2]]]] & /@ RandomSample[aCImageVecs, 6]
07tn6wh5t97j4

Clustering over the image
vectors

In this section we cluster “image vectors” and demonstrate that the
obtained clusters have certain explainability elements. Expected Chinese
character radicals are observed using image multiplication.

Cluster the image vectors and show summary of the clusters
lengths:

SparseArray[Values@aCImageVecs]
1n5cwcrgj2d3m
SeedRandom[334];
AbsoluteTiming[
  lsClusters = FindClusters[SparseArray[Values@aCImageVecs] -> Keys[aCImageVecs], 35, Method -> {"KMeans"}]; 
 ]
Length@lsClusters
ResourceFunction["RecordsSummary"][Length /@ lsClusters]

(*{24.6383, Null}*)

(*35*)
0lvt8mcfzpvhg

For each cluster:

  • Take 30 different small samples of 7 images
  • Multiply the images in each small sample
  • Show three “most black” the multiplication results
SeedRandom[33];
Table[i -> TakeLargestBy[Table[ImageMultiply @@ RandomSample[KeyTake[aCImages, lsClusters[[i]]], UpTo[7]], 30], Total@ImageToVector[#] &, 3], {i, Length[lsClusters]}]
0erc719h7lnzi

Remark: We can see that the clustering above
produced “semantic” clusters – most of the multiplied images show
meaningful Chinese characters radicals and their “expected
positions.”

Here is one of the clusters with the radical “mouth”:

KeyTake[aCImages, lsClusters[[26]]]
131vpq9dabrjo

LSAMon application

In this section we apply the “standard” LSA workflow, [AA1, AA4].

Make a matrix with named rows and columns from the image vectors:

mat = ToSSparseMatrix[SparseArray[Values@aCImageVecs], "RowNames" -> Keys[aCImageVecs], "ColumnNames" -> Automatic]
0jdmyfb9rsobz

The following Latent Semantic Analysis (LSA) monadic pipeline is used
in [AA2, AA2]:

SeedRandom[77];
AbsoluteTiming[
  lsaAllObj = 
    LSAMonUnit[]\[DoubleLongRightArrow]
     LSAMonSetDocumentTermMatrix[mat]\[DoubleLongRightArrow]
     LSAMonApplyTermWeightFunctions["None", "None", "Cosine"]\[DoubleLongRightArrow]
     LSAMonExtractTopics["NumberOfTopics" -> 60, Method -> "SVD", "MaxSteps" -> 15, "MinNumberOfDocumentsPerTerm" -> 0]\[DoubleLongRightArrow]
     LSAMonNormalizeMatrixProduct[Normalized -> Right]\[DoubleLongRightArrow]
     LSAMonEcho[Style["Obtained basis:", Bold, Purple]]\[DoubleLongRightArrow]
     LSAMonEchoFunctionContext[ImageAdjust[Image[Partition[#, ImageDimensions[aCImages[[1]]][[1]]]]] & /@SparseArray[#H] &]; 
 ]
088nutsaye7yl
0j7joulwrnj30
(*{7.60828, Null}*)

Remark: LSAMon’s corresponding theory and design are
discussed in [AA1, AA4]:

Get the representation matrix:

W2 = lsaAllObj\[DoubleLongRightArrow]LSAMonNormalizeMatrixProduct[Normalized -> Right]\[DoubleLongRightArrow]LSAMonTakeW
1nno5c4wmc83q

Get the topics matrix:

H = lsaAllObj\[DoubleLongRightArrow]LSAMonNormalizeMatrixProduct[Normalized -> Right]\[DoubleLongRightArrow]LSAMonTakeH
1gtqe0ihshi9s

Cluster the reduced dimension
representations
and show summary of the clusters
lengths:

AbsoluteTiming[
  lsClusters = FindClusters[Normal[SparseArray[W2]] -> RowNames[W2], 40, Method -> {"KMeans"}]; 
 ]
Length@lsClusters
ResourceFunction["RecordsSummary"][Length /@ lsClusters]

(*{2.33331, Null}*)

(*40*)
1bu5h88uiet3e

Show cluster interpretations:

AbsoluteTiming[aAutoRadicals = Association@Table[i -> TakeLargestBy[Table[ImageMultiply @@ RandomSample[KeyTake[aCImages, lsClusters[[i]]], UpTo[8]], 30], Total@ImageToVector[#] &, 3], {i, Length[lsClusters]}]; 
 ]
aAutoRadicals

(*{0.878406, Null}*)
05re59k8t4u4u

Using FeatureExtraction

I experimented with clustering and approximation using WL’s function
FeatureExtraction.
Result are fairly similar as the above; timings a different (a few times
slower.)

Visual thesaurus

In this section we use Cosine similarity to find visual nearest
neighbors of Chinese character images.

matPixels = WeightTermsOfSSparseMatrix[lsaAllObj\[DoubleLongRightArrow]LSAMonTakeWeightedDocumentTermMatrix, "IDF", "None", "Cosine"];
matTopics = WeightTermsOfSSparseMatrix[lsaAllObj\[DoubleLongRightArrow]LSAMonNormalizeMatrixProduct[Normalized -> Left]\[DoubleLongRightArrow]LSAMonTakeW, "None", "None", "Cosine"];
smrObj = SMRMonUnit[]\[DoubleLongRightArrow]SMRMonCreate[<|"Topic" -> matTopics, "Pixel" -> matPixels|>];

Consider the character “團”:

aCImages["團"]
0pi2u9ejqv9wd

Here are the nearest neighbors for that character found by using both
image topics and image pixels:

(*focusItem=RandomChoice[Keys@aCImages];*)
  focusItem = {"團", "仼", "呔"}[[1]]; 
   smrObj\[DoubleLongRightArrow]
     SMRMonEcho[Style["Nearest neighbors by pixel topics:", Bold, Purple]]\[DoubleLongRightArrow]
     SMRMonSetTagTypeWeights[<|"Topic" -> 1, "Pixel" -> 0|>]\[DoubleLongRightArrow]
     SMRMonRecommend[focusItem, 8, "RemoveHistory" -> False]\[DoubleLongRightArrow]
     SMRMonEchoValue\[DoubleLongRightArrow]
     SMRMonEchoFunctionValue[AssociationThread[Values@KeyTake[aCImages, Keys[#]], Values[#]] &]\[DoubleLongRightArrow]
     SMRMonEcho[Style["Nearest neighbors by pixels:", Bold, Purple]]\[DoubleLongRightArrow]
     SMRMonSetTagTypeWeights[<|"Topic" -> 0, "Pixel" -> 1|>]\[DoubleLongRightArrow]
     SMRMonRecommend[focusItem, 8, "RemoveHistory" -> False]\[DoubleLongRightArrow]
     SMRMonEchoFunctionValue[AssociationThread[Values@KeyTake[aCImages, Keys[#]], Values[#]] &];
1l9yz2e8pvlyl
03bc668vzyh4v
00ecjkyzm4e2s
1wsyx76kjba1g
18wdi99m1k99j

Remark: Of course, in the recommender pipeline above
we can use both pixels and pixels topics. (With their contributions
being weighted.)

Graph clustering

In this section we demonstrate the use of graph communities to find
similar groups of Chinese characters.

Here we take a sub-matrix of the reduced dimension matrix computed
above:

W = lsaAllObj\[DoubleLongRightArrow]LSAMonNormalizeMatrixProduct[Normalized -> Right]\[DoubleLongRightArrow]LSAMonTakeW;

Here we find the similarity matrix between the characters and remove
entries corresponding to “small” similarities:

matSym = Clip[W . Transpose[W], {0.78, 1}, {0, 1}];

Here we plot the obtained (clipped) similarity matrix:

MatrixPlot[matSym]
1nvdb26265li6

Here we:

  • Take array rules of the sparse similarity matrix
  • Drop the rules corresponding to the diagonal elements
  • Convert the keys of rules into uni-directed graph edges
  • Make the corresponding graph
  • Find graph’s connected components
  • Show the number of connected components
  • Show a tally of the number of nodes in the components
gr = Graph[UndirectedEdge @@@ DeleteCases[Union[Sort /@ Keys[SSparseMatrixAssociation[matSym]]], {x_, x_}]];
lsComps = ConnectedComponents[gr];
Length[lsComps]
ReverseSortBy[Tally[Length /@ lsComps], First]

(*138*)

(*{{1839, 1}, {31, 1}, {27, 1}, {16, 1}, {11, 2}, {9, 2}, {8, 1}, {7, 1}, {6, 5}, {5, 3}, {4, 8}, {3, 14}, {2, 98}}*)

Here we demonstrate the clusters of Chinese characters make
sense:

aPrettyRules = Dispatch[Map[# -> Style[#, FontSize -> 36] &, Keys[aCImages]]]; CommunityGraphPlot[Subgraph[gr, TakeLargestBy[lsComps, Length, 10][[2]]], Method -> "SpringElectrical", VertexLabels -> Placed["Name", Above],AspectRatio -> 1, ImageSize -> 1000] /. aPrettyRules
1c0w4uhnyn2jx

Remark: By careful observation of the clusters and
graph connections we can convince ourselves that the similarities are
based on pictorial sub-elements (i.e. radicals) of the characters.

Hierarchical clustering

In this section we apply hierarchical clustering to the reduced
dimension representation of the Chinese character images.

Here we pick a cluster:

lsFocusIDs = lsClusters[[12]];
Magnify[ImageCollage[Values[KeyTake[aCImages, lsFocusIDs]]], 0.4]
14cnicsw2rvrt

Here is how we can make a dendrogram plot (not that useful here):

(*smat=W2\[LeftDoubleBracket]lsClusters\[LeftDoubleBracket]13\[RightDoubleBracket],All\[RightDoubleBracket];
Dendrogram[Thread[Normal[SparseArray[smat]]->Map[Style[#,FontSize->16]&,RowNames[smat]]],Top,DistanceFunction->EuclideanDistance]*)

Here is a heat-map plot with hierarchical clustering dendrogram (with
tool-tips):

gr = HeatmapPlot[W2[[lsFocusIDs, All]], DistanceFunction -> {CosineDistance, None}, Dendrogram -> {True, False}];
gr /. Map[# -> Tooltip[Style[#, FontSize -> 16], Style[#, Bold, FontSize -> 36]] &, lsFocusIDs]
0vz82un57054q

Remark: The plot above has tooltips with larger
character images.

Representing
all characters with smaller set of basic ones

In this section we demonstrate that a relatively small set of simpler
Chinese character images can be used to represent (or approxumate) the
rest of the images.

Remark: We use the following heuristic: the simpler
Chinese characters have the smallest amount of white pixels.

Obtain a training set of images – that are the darkest – and show a
sample of that set :

{trainingInds, testingInds} = TakeDrop[Keys[SortBy[aCImages, Total[ImageToVector[#]] &]], 800];
SeedRandom[3];
RandomSample[KeyTake[aCImages, trainingInds], 12]
10275rv8gn1qt

Show all training characters with an image collage:

Magnify[ImageCollage[Values[KeyTake[aCImages, trainingInds]], Background -> Gray, ImagePadding -> 1], 0.4]
049bs0w0x26jw

Apply LSA monadic pipeline with the training characters only:

SeedRandom[77];
AbsoluteTiming[
  lsaPartialObj = 
    LSAMonUnit[]\[DoubleLongRightArrow]
     LSAMonSetDocumentTermMatrix[SparseArray[Values@KeyTake[aCImageVecs, trainingInds]]]\[DoubleLongRightArrow]
     LSAMonApplyTermWeightFunctions["None", "None", "Cosine"]\[DoubleLongRightArrow]
     LSAMonExtractTopics["NumberOfTopics" -> 80, Method -> "SVD", "MaxSteps" -> 120, "MinNumberOfDocumentsPerTerm" -> 0]\[DoubleLongRightArrow]
     LSAMonNormalizeMatrixProduct[Normalized -> Right]\[DoubleLongRightArrow]
     LSAMonEcho[Style["Obtained basis:", Bold, Purple]]\[DoubleLongRightArrow]
     LSAMonEchoFunctionContext[ImageAdjust[Image[Partition[#, ImageDimensions[aCImages[[1]]][[1]]]]] & /@SparseArray[#H] &]; 
 ]
0i509m9n2d2p8
1raokwq750nyi
(*{0.826489, Null}*)

Get the matrix and basis interpretation of the extracted image
topics:

H = 
   lsaPartialObj\[DoubleLongRightArrow]
    LSAMonNormalizeMatrixProduct[Normalized -> Right]\[DoubleLongRightArrow]
    LSAMonTakeH;
lsBasis = ImageAdjust[Image[Partition[#, ImageDimensions[aCImages[[1]]][[1]]]]] & /@ SparseArray[H];

Approximation of “unseen”
characters

Pick a Chinese character image as a target image and pre-process
it:

ind = RandomChoice[testingInds];
imgTest = aCImages[ind];
matImageTest = ToSSparseMatrix[SparseArray@List@ImageToVector[imgTest, ImageDimensions[aCImages[[1]]]], "RowNames" -> Automatic, "ColumnNames" -> Automatic];
imgTest
15qkrj0nw08mv

Find its representation with the chosen feature extractor (LSAMon
object here):

matReprsentation = lsaPartialObj\[DoubleLongRightArrow]LSAMonRepresentByTopics[matImageTest]\[DoubleLongRightArrow]LSAMonTakeValue;
lsCoeff = Normal@SparseArray[matReprsentation[[1, All]]];
ListPlot[MapIndexed[Tooltip[#1, lsBasis[[#2[[1]]]]] &, lsCoeff], Filling -> Axis, PlotRange -> All]
0cn7ty6zf3mgo

Show representation coefficients outliers:

lsBasis[[OutlierPosition[Abs[lsCoeff], TopOutliers@*HampelIdentifierParameters]]]
1w6jkhdpxlxw8

Show the interpretation of the found representation:

vecReprsentation = lsCoeff . SparseArray[H];
reprImg = Image[Unitize@Clip[#, {0.45, 1}, {0, 1}] &@Rescale[Partition[vecReprsentation, ImageDimensions[aCImages[[1]]][[1]]]]];
{reprImg, imgTest}
0c84q1hscjubu

See the closest characters using image distances:

KeyMap[# /. aCImages &, TakeSmallest[ImageDistance[reprImg, #] & /@ aCImages, 4]]
1vtcw1dhzlet5

Remark: By applying the approximation procedure to
all characters in testing set we can convince ourselves that small,
training set provides good retrieval. (Not done here.)

Finding more interpretable
bases

In this section we show how to use LSA workflow with Non-Negative
Matrix Factorization (NNMF)
over an image set extended with already
extracted “topic” images.

Cleaner automatic radicals

aAutoRadicals2 = Map[Dilation[Binarize[DeleteSmallComponents[#]], 0.5] &, First /@ aAutoRadicals]
10eg2eaajgiit

Here we take an image union in order to remove the “duplicated”
radicals:

aAutoRadicals3 = AssociationThread[Range[Length[#]], #] &@Union[Values[aAutoRadicals2], SameTest -> (ImageDistance[#1, #2] < 14.5 &)]
1t09xi5nlycaw

LSAMon pipeline with NNMF

Make a matrix with named rows and columns from the image vectors:

mat1 = ToSSparseMatrix[SparseArray[Values@aCImageVecs], "RowNames" -> Keys[aCImageVecs], "ColumnNames" -> Automatic]
0np1umfcks9hm

Enhance the matrix with radicals instances:

mat2 = ToSSparseMatrix[SparseArray[Join @@ Map[Table[ImageToVector[#], 100] &, Values[aAutoRadicals3]]], "RowNames" -> Automatic, "ColumnNames" -> Automatic];
mat3 = RowBind[mat1, mat2];

Apply the LSAMon workflow pipeline with NNMF for topic
extraction:

SeedRandom[77];
AbsoluteTiming[
  lsaAllExtendedObj = 
    LSAMonUnit[]\[DoubleLongRightArrow]
     LSAMonSetDocumentTermMatrix[mat3]\[DoubleLongRightArrow]
     LSAMonApplyTermWeightFunctions["None", "None", "Cosine"]\[DoubleLongRightArrow]
     LSAMonExtractTopics["NumberOfTopics" -> 60, Method -> "NNMF", "MaxSteps" -> 15, "MinNumberOfDocumentsPerTerm" -> 0]\[DoubleLongRightArrow]
     LSAMonNormalizeMatrixProduct[Normalized -> Right]\[DoubleLongRightArrow]
     LSAMonEcho[Style["Obtained basis:", Bold, Purple]]\[DoubleLongRightArrow]
     LSAMonEchoFunctionContext[ImageAdjust[Image[Partition[#, ImageDimensions[aCImages[[1]]][[1]]]]] & /@SparseArray[#H] &]; 
 ]
1mc1fa16ylzcu
1c6p7pzemk6qx
(*{155.289, Null}*)

Remark: Note that NNMF “found” the interpretable
radical images we enhanced the original image set with.

Get the matrix and basis interpretation of the extracted image
topics:

H = 
   lsaAllExtendedObj\[DoubleLongRightArrow]
    LSAMonNormalizeMatrixProduct[Normalized -> Right]\[DoubleLongRightArrow]
    LSAMonTakeH;
lsBasis = ImageAdjust[Image[Partition[#, ImageDimensions[aCImages[[1]]][[1]]]]] & /@ SparseArray[H];

Approximation

Pick a Chinese character image as a target image and pre-process
it:

SeedRandom[43];
ind = RandomChoice[testingInds];
imgTest = aCImages[ind];
matImageTest = ToSSparseMatrix[SparseArray@List@ImageToVector[imgTest, ImageDimensions[aCImages[[1]]]], "RowNames" -> Automatic, "ColumnNames" -> Automatic];
imgTest
1h2aitm71mnl5

Find its representation with the chosen feature extractor (LSAMon
object here):

matReprsentation = lsaAllExtendedObj\[DoubleLongRightArrow]LSAMonRepresentByTopics[matImageTest]\[DoubleLongRightArrow]LSAMonTakeValue;
lsCoeff = Normal@SparseArray[matReprsentation[[1, All]]];
ListPlot[MapIndexed[Tooltip[#1, lsBasis[[#2[[1]]]]] &, lsCoeff], Filling -> Axis, PlotRange -> All]
084vbifk2zvi3

Show representation coefficients outliers:

lsBasis[[OutlierPosition[Abs[lsCoeff], TopOutliers@*QuartileIdentifierParameters]]]
06xq4p3k31fzt

Remark: Note that expected
radical images are in the outliers.

Show the interpretation of the found representation:

vecReprsentation = lsCoeff . SparseArray[H];
reprImg = Image[Unitize@Clip[#, {0.45, 1}, {0, 1}] &@Rescale[Partition[vecReprsentation, ImageDimensions[aCImages[[1]]][[1]]]]];
{reprImg, imgTest}
01xeidbc9qme6

See the closest characters using image distances:

KeyMap[# /. aCImages &, TakeSmallest[ImageDistance[reprImg, #] & /@ aCImages, 4]]
1mrut9izhycrn

Setup

Import["https://raw.githubusercontent.com/antononcube/MathematicaForPrediction/master/MonadicProgramming/MonadicLatentSemanticAnalysis.m"];
Import["https://raw.githubusercontent.com/antononcube/MathematicaForPrediction/master/MonadicProgramming/MonadicSparseMatrixRecommender.m"];
Import["https://raw.githubusercontent.com/antononcube/MathematicaForPrediction/master/Misc/HeatmapPlot.m"]

References

[SH1] Silvia Hao, “Exploring
structure of Chinese characters through image processing”
, (2022),
Wolfram Community.

[AA1] Anton Antonov, “A monad for
Latent Semantic Analysis workflows”
, (2019), Wolfram Community.

[AA2] Anton Antonov, “LSA methods
comparison over random mandalas deconstruction – WL”
, (2022), Wolfram Community.

[AA3] Anton Antonov, “Bethlehem
stars: classifying randomly generated mandalas”
, (2020), Wolfram Community.

[AA4] Anton Antonov, “Random mandalas deconstruction in R, Python, and Mathematica”, (2022), MathematicaForPrediction at WordPress.

[AAp1] Anton Antonov, LSAMon
for Image Collections Mathematica package
, (2022), MathematicaForPrediction
at GitHub
.

A monad for Epidemiologic Compartmental Modeling Workflows

Version 0.8

Introduction

In this document we describe the design and demonstrate the implementation of a (software programming) monad, [Wk1], for Epidemiology Compartmental Modeling (ECM) workflows specification and execution. The design and implementation are done with Mathematica / Wolfram Language (WL). A very similar implementation is also done in R.

Monad’s name is “ECMMon”, which stands for “Epidemiology Compartmental Modeling Monad”, and its monadic implementation is based on the State monad package “StateMonadCodeGenerator.m”, [AAp1, AA1], ECMMon is implemented in the package [AAp8], which relies on the packages [AAp3-AAp6]. The original ECM workflow discussed in [AA5] was implemented in [AAp7]. An R implementation of ECMMon is provided by the package [AAr2].

The goal of the monad design is to make the specification of ECM workflows (relatively) easy and straightforward by following a certain main scenario and specifying variations over that scenario.

We use real-life COVID-19 data, The New York Times COVID-19 data, see [NYT1, AA5].

The monadic programming design is used as a Software Design Pattern. The ECMMon monad can be also seen as a Domain Specific Language (DSL) for the specification and programming of epidemiological compartmental modeling workflows.

Here is an example of using the ECMMon monad over a compartmental model with two types of infected populations:

0ejgq885m1unt

14u60cftusqlc

06grm5lhtjiv9

The table above is produced with the package “MonadicTracing.m”, [AAp2, AA1], and some of the explanations below also utilize that package.

As it was mentioned above the monad ECMMon can be seen as a DSL. Because of this the monad pipelines made with ECMMon are sometimes called “specifications”.

Contents description

The document has the following structure.

  • The sections “Package load” and “Data load” obtain the needed code and data.
  • The section “Design consideration” provide motivation and design decisions rationale.
  • The section “Single site models” give brief descriptions of certain “seed” models that can be used in the monad.
  • The section “Single-site model workflow demo”, “Multi-site workflow demo” give demonstrations of how to utilize the ECMMon monad .
    • Using concrete practical scenarios and “real life” data.
  • The section “Batch simulation and calibration process” gives methodological preparation for the content of the next two sections.
  • The section “Batch simulation workflow” and “Calibration workflow” describe how to do most important monad workflows after the model is developed.
  • The section “Future plans” outlines future directions of development.

Remark: One can read only the sections “Introduction”, “Design consideration”, “Single-site models”, and “Batch simulation and calibration process”. That set of sections provide a fairly good, programming language agnostic exposition of the substance and novel ideas of this document.

Package load

In this section we load packages used in this notebook:

Import["https://raw.githubusercontent.com/antononcube/SystemModeling/master/Projects/Coronavirus-propagation-dynamics/WL/MonadicEpidemiologyCompartmentalModeling.m"];Import["https://raw.githubusercontent.com/antononcube/SystemModeling/master/Projects/Coronavirus-propagation-dynamics/WL/MultiSiteModelSimulation.m"]Import["https://raw.githubusercontent.com/antononcube/MathematicaForPrediction/master/MonadicProgramming/MonadicTracing.m"]Import["https://raw.githubusercontent.com/antononcube/ConversationalAgents/master/Packages/WL/ExternalParsersHookup.m"]

Remark: The import commands above would trigger some other package imports.

Data load

In this section we ingest data using the “umbrella function” MultiSiteModelReadData from [AAp5]:

Read data

AbsoluteTiming[  aData = MultiSiteModelReadData[];  ](*{38.8635, Null}*)

Data summaries

ResourceFunction["RecordsSummary"] /@ aData

01mnhk5boxlto

Transform data

Here we transform the population related data in a form convenient for specifying the simulations with it:

aPopulations = Association@Map[{#Lon, #Lat} -> #Population &, Normal[aData["CountyRecords"]]];aInfected = Association@Map[{#Lon, #Lat} -> #Cases &, Normal[aData["CasesAndDeaths"]]];aDead = Association@Map[{#Lon, #Lat} -> #Deaths &, Normal[aData["CasesAndDeaths"]]];

Geo-visualizations

Using the built-in function GeoHistogram we summarize the USA county populations, and COViD-19 infection cases and deaths:

Row@MapThread[GeoHistogram[KeyMap[Reverse, #1], Quantity[140, "Miles"], PlotLabel -> #2, PlotTheme -> "Scientific", PlotLegends -> Automatic, ImageSize -> Medium] &, {{aPopulations, aInfected, aDead}, {"Populations", "Infected", "Dead"}}]

1km2posdmqoic

(Note that in the plots above we have to reverse the keys of the given population associations.)

Using the function HextileHistogram from [AAp7 ] here we visualize USA county populations over a hexagonal grid with cell radius 2 degrees ((\approx 140) miles (\approx 222) kilometers):

HextileHistogram[aPopulations, 2, PlotRange -> All, PlotLegends -> Automatic, ImageSize -> Large]

0lqx1d453pio1

In this notebook we prefer using HextileHistogram because it represents the simulation data in geometrically more faithful way.

Design considerations

The big picture

The main purpose of the designed epidemic compartmental modeling framework (i.e. software monad) is to have the ability to do multiple, systematic simulations for different scenario play-outs over large scale geographical regions. The target end-users are decision makers at government level and researchers of pandemic or other large scale epidemic effects.

Here is a diagram that shows the envisioned big picture workflow:

Model-development-and-decision-making

Large-scale modeling

The standard classical compartmental epidemiology models are not adequate over large geographical areas, like, countries. We design a software framework – the monad ECMMon – that allows large scale simulations using a simple principle workflow:

  1. Develop a single-site model for relatively densely populated geographical area for which the assumptions of the classical models (approximately) hold.
  2. Extend the single-site model into a large-scale multi-site model using statistically derived traveling patterns; see [AA4].
  3. Supply the multi-site model with appropriately prepared data.
  4. Run multiple simulations to see large scale implications of different policies.
  5. Calibrate the model to concrete observed (or faked) data. Go to 4.

Flow chart

The following flow chart visualizes the possible workflows the software monad ECMMon:

ECMMon-workflow

Two models in the monad

  • An ECMMon object can have one or two models. One of the models is a “seed”, single-site model from [AAp1], which, if desired, is scaled into a multi-site model, [AA3, AAp2].
  • Workflows with only the single-site model are supported.
    • Say, workflows for doing sensitivity analysis, [AA6, BC1].
  • Scaling of a single-site model into multi-site is supported and facilitated.
  • Workflows for the multi-site model include preliminary model scaling steps and simulation steps.
  • After the single-site model is scaled the monad functions use the multi-site model.
  • The workflows should be easy to specify and read.

Single-site model workflow

  1. Make a single-site model.
  2. Assign stocks initial conditions.
  3. Assign rates values.
  4. Simulate.
  5. Plot results.
  6. Go to 2.

Multi-site model workflow

  1. Make a single-site model.
  2. Assign initial conditions and rates.
  3. Scale the single-site model into a multi-site model.
    1. The single-site assigned rates become “global” when the single-site model is scaled.
    2. The scaling is based on assumptions for traveling patterns of the populations.
    3. There are few alternatives for that scaling:
      1. Using locations geo-coordinates
      2. Using regular grids covering a certain area based on in-habited locations geo-coordinates
      3. Using traveling patterns contingency matrices
      4. Using “artificial” patterns of certain regular types for qualitative analysis purposes
  4. Enhance the multi-site traveling patterns matrix and re-scale the single site model.
    1. We might want to combine traveling patterns by ground transportation with traveling patterns by airplanes.
    2. For quarantine scenarios this might a less important capability of the monad.
      1. Hence, this an optional step.
  5. Assign stocks initial conditions for each of the sites in multi-scale model.
  6. Assign rates for each of the sites.
  7. Simulate.
  8. Plot global simulation results.
  9. Plot simulation results for focus sites.

Single-site models

We have a collection of single-site models that have different properties and different modeling goals, [AAp3, AA7, AA8]. Here is as diagram of a single-site model that includes hospital beds and medical supplies as limitation resources, [AA7]:

Coronavirus-propagation-simple-dynamics

SEI2HR model

In this sub-section we briefly describe the model SEI2HR, which is used in the examples below.

Remark: SEI2HR stands for “Susceptible, Exposed, Infected Two, Hospitalized, Recovered” (populations).

Detailed description of the SEI2HR model is given in [AA7].

Verbal description

We start with one infected (normally symptomatic) person, the rest of the people are susceptible. The infected people meet other people directly or get in contact with them indirectly. (Say, susceptible people touch things touched by infected.) For each susceptible person there is a probability to get the decease. The decease has an incubation period: before becoming infected the susceptible are (merely) exposed. The infected recover after a certain average infection period or die. A certain fraction of the infected become severely symptomatic. If there are enough hospital beds the severely symptomatic infected are hospitalized. The hospitalized severely infected have different death rate than the non-hospitalized ones. The number of hospital beds might change: hospitals are extended, new hospitals are build, or there are not enough medical personnel or supplies. The deaths from infection are tracked (accumulated.) Money for hospital services and money from lost productivity are tracked (accumulated.)

The equations below give mathematical interpretation of the model description above.

Equations

Here are the equations of one the epidemiology compartmental models, SEI2HR, [AA7], implemented in [AAp3]:

ModelGridTableForm[SEI2HRModel[t], "Tooltips" -> False]["Equations"] /. {eq_Equal :> TraditionalForm[eq]}

1fjs0wfx4mrpj

The equations for Susceptible, Exposed, Infected, Recovered populations of SEI2R are “standard” and explanations about them are found in [WK2, HH1]. For SEI2HR those equations change because of the stocks Hospitalized Population and Hospital Beds.

The equations time unit is one day. The time horizon is one year. In this document we consider COVID-19, [Wk2, AA1], hence we do not consider births.

Single-site model workflow demo

In this section we demonstrate some of the sensitivity analysis discussed in [AA6, BC1].

Make a single-site model, SEI2HR:

model1 = SEI2HRModel[t, "InitialConditions" -> True, "RateRules" -> True, "TotalPopulationRepresentation" -> "AlgebraicEquation"];

Make an association with “default” parameters:

aDefaultPars = <|    aip -> 26,     aincp -> 5,     \[Beta][ISSP] -> 0.5*Piecewise[{{1, t < qsd}, {qcrf, qsd <= t <= qsd + ql}}, 1],     \[Beta][INSP] -> 0.5*Piecewise[{{1, t < qsd}, {qcrf, qsd <= t <= qsd + ql}}, 1],     qsd -> 60,     ql -> 21,     qcrf -> 0.25,     \[Beta][HP] -> 0.01,     \[Mu][ISSP] -> 0.035/aip,     \[Mu][INSP] -> 0.01/aip,     nhbr[TP] -> 3/1000,     lpcr[ISSP, INSP] -> 1,     hscr[ISSP, INSP] -> 1    |>;

Execute the workflow multiple times with different quarantine starts:

qlVar = 56;lsRes =  Map[   ECMMonUnit[]     ECMMonSetSingleSiteModel[model1]     ECMMonAssignRateRules[Join[aDefaultPars, <|qsd -> #, ql -> qlVar|>]]     ECMMonSimulate[365]     ECMMonPlotSolutions[{"Infected Severely Symptomatic Population"}, 240,        "Together" -> True, "Derivatives" -> False,        PlotRange -> {0, 12000}, ImageSize -> 250,        Epilog -> {Orange, Dashed, Line[{{#1, 0}, {#1, 12000}}], Line[{{#1 + qlVar, 0}, {#1 + qlVar, 12000}}]},        PlotLabel -> Row[{"Quarantine start:", Spacer[5], #1, ",", Spacer[5], "end:", Spacer[5], #1 + qlVar}],        "Echo" -> False]     ECMMonTakeValue &, Range[25, 100, 5]];

Plot the simulation solutions for “Infected Severely Symptomatic Population”:

Multicolumn[#[[1, 1]] & /@ lsRes, 4]

1db54x7hgf4iw

Both theoretical and computational details of the workflow above are given [AA7, AA8].

Multi-site workflow demo

In this section we demonstrate the multi-site model workflow using COVID-19 data for USA, [WRI2, NYT1].

Here a “seed”, single-site model is created:

model1 = SEI2HRModel[t, "InitialConditions" -> True, "RateRules" -> True, "TotalPopulationRepresentation" -> "AlgebraicEquation"];

Here we specify a multi-site model workflow (the monadic steps are separated and described with purple print-outs):

ecmObj =    ECMMonUnit[]    ECMMonSetSingleSiteModel[model1]    ECMMonAssignRateRules[     <|      aip -> 26,       aincp -> 5,       \[Beta][ISSP] -> 0.5*Piecewise[{{1, t < qsd}, {qcrf, qsd <= t <= qsd + ql}}, 1],       \[Beta][INSP] -> 0.5*Piecewise[{{1, t < qsd}, {qcrf, qsd <= t <= qsd + ql}}, 1],       qsd -> 0,       ql -> 56,       qcrf -> 0.25,       \[Beta][HP] -> 0.01,       \[Mu][ISSP] -> 0.035/aip,       \[Mu][INSP] -> 0.01/aip,       nhbr[TP] -> 3/1000,       lpcr[ISSP, INSP] -> 1,       hscr[ISSP, INSP] -> 1      |>     ]    ECMMonEcho[Style["Show the single-site model tabulated form:", Bold, Purple]]    ECMMonEchoFunctionContext[Magnify[ModelGridTableForm[#singleSiteModel], 1] &]    ECMMonMakePolygonGrid[Keys[aPopulations], 1.5, "BinningFunction" -> Automatic]    ECMMonEcho[Style["Show the grid based on population coordinates:", Bold, Purple]]    ECMMonPlotGrid["CellIDs" -> True, ImageSize -> Large]    ECMMonExtendByGrid[aPopulations, 0.12]    ECMMonAssignInitialConditions[aPopulations, "Total Population", "Default" -> 0]    ECMMonAssignInitialConditions[DeriveSusceptiblePopulation[aPopulations, aInfected, aDead], "Susceptible Population", "Default" -> 0]    ECMMonAssignInitialConditions[<||>, "Exposed Population", "Default" -> 0]    ECMMonAssignInitialConditions[aInfected, "Infected Normally Symptomatic Population", "Default" -> 0]    ECMMonAssignInitialConditions[<||>, "Infected Severely Symptomatic Population", "Default" -> 0]    ECMMonEcho[Style["Show total populations initial conditions data:", Bold, Purple]]    ECMMonPlotGridHistogram[aPopulations, ImageSize -> Large, PlotLabel -> "Total populations"]    ECMMonEcho[Style["Show infected and deceased initial conditions data:", Bold,Purple]]    ECMMonPlotGridHistogram[aInfected, ColorFunction -> ColorData["RoseColors"], "ShowDataPoints" -> False, ImageSize -> Large, PlotLabel -> "Infected"]    ECMMonPlotGridHistogram[aDead, ColorFunction -> ColorData["RoseColors"], "ShowDataPoints" -> False, ImageSize -> Large, PlotLabel -> "Deceased"]    ECMMonEcho[Style["Simulate:", Bold, Purple]]    ECMMonSimulate[365]    ECMMonEcho[Style["Show global population simulation results:", Bold, Purple]]    ECMMonPlotSolutions[__ ~~ "Population", 365]    ECMMonEcho[Style["Show site simulation results for Miami and New York areas:", Bold, Purple]]    ECMMonPlotSiteSolutions[{160, 174}, __ ~~ "Population", 365]    ECMMonEcho[Style["Show deceased and hospitalzed populations results for Miami and New York areas:", Bold, Purple]]    ECMMonPlotSiteSolutions[{160, 174}, {"Deceased Infected Population", "Hospitalized Population","Hospital Beds"}, 300, "FocusTime" -> 120];

0y0cfyttq7yn6

0gh46eljka9v5

04xdyad4mmniu

1mn5x0eb0hbvl

009qnefuurlhw

09xeiox9ane2w

13kldiv0a47ua

0jjxrwhkaj7ys

1qgjcibkzvib0

1bm71msuv1s02

0l96q6lg8vg9n

1w1u7nso952k8

0gp4bff16s2rj

1pfvwkdwlm72j

0in55gql6v1yi

1fxxap0npojve

1e0ctc7lt1tbh

Theoretical and computational details about the multi-site workflow can be found in [AA4, AA5].

Batch simulations and calibration processes

In this section we describe the in general terms the processes of model batch simulations and model calibration. The next two sections give more details of the corresponding software design and workflows.

Definitions

Batch simulation: If given a SD model (M), the set (P) of parameters of (M), and a set (B) of sets of values (P), (B\text{:=}\left{V_i\right}), then the set of multiple runs of (M) over (B) are called batch simulation.

Calibration: If given a model (M), the set (P) of parameters of (M), and a set of (k) time series (T\text{:=}\left{T_i\right}_{i=1}^k) that correspond to the set of stocks (S\text{:=}\left{S_i\right}_{i=1}^k) of (M) then the process of finding concrete the values (V) for (P) that make the stocks (S) to closely resemble the time series (T) according to some metric is called calibration of (M) over the targets (T).

Roles

  • There are three types of people dealing with the models:
    • Modeler, who develops and implements the model and prepares it for calibration.
    • Calibrator, who calibrates the model with different data for different parameters.
    • Stakeholder, who requires different features of the model and outcomes from different scenario play-outs.
  • There are two main calibration scenarios:
    • Modeler and Calibrator are the same person
    • Modeler and Calibrator are different persons

Process

Model development and calibration is most likely going to be an iterative process.

For concreteness let us assume that the model has matured development-wise and batch simulation and model calibration is done in a (more) formal way.

Here are the steps of a well defined process between the modeling activity players described above:

  1. Stakeholder requires certain scenarios to be investigated.
  2. Modeler prepares the model for those scenarios.
  3. Stakeholder and Modeler formulate a calibration request.
  4. Calibrator uses the specifications from the calibration request to:
    1. Calibrate the model
    2. Derive model outcomes results
    3. Provide model qualitative results
    4. Provide model sensitivity analysis results
  5. Modeler (and maybe Stakeholder) review the results and decides should more calibration be done.
    1. I.e. go to 3.
  6. Modeler does batch simulations with the calibrated model for the investigation scenarios.
  7. Modeler and Stakeholder prepare report with the results.

See the documents [AA9, AA10] have questionnaires that further clarify the details of interaction between the modelers and calibrators.

Batch simulation vs calibration

In order to clarify the similarities and differences between batch simulation and calibration we list the following observations:

  • Each batch simulation or model calibration is done either for model development purposes or for scenario play-out studies.
  • Batch simulation is used for qualitative studies of the model. For example, doing sensitivity analysis; see [BC1, AA7, AA8].
  • Before starting the calibration we might want to study the “landscape” of the search space of the calibration parameters using batch simulations.
  • Batch simulation is also done after model calibration in order to evaluate different scenarios,
  • For some models with large computational complexity batch simulation – together with some evaluation metric – can be used instead of model calibration.

Batch simulations workflow

In this section we describe the specification and execution of model batch simulations.

Batch simulations can be time consuming, hence it is good idea to

In the rest of the section we go through the following steps:

  1. Make a model object
  2. Batch simulate over a few combinations of parameters and show:
    1. Plots of the simulation results for all populations
    2. Plots of the simulation results for a particular population
  3. Batch simulate over the Cartesian (outer) product of values lists of a selected pair of parameters and show the corresponding plots of all simulations

Model (object) for batch simulations

Here we make a new ECMMon object:

ecmObj2 =  ECMMonUnit[]   ECMMonSetSingleSiteModel[model1]   ECMMonAssignRateRules[aDefaultPars];

Direct specification of combinations of parameters

All populations

Here we simulate the model in the object of different parameter combinations given in a list of associations:

res1 =  ecmObj2   ECMMonBatchSimulate[___ ~~ "Population", {<|qsd -> 60, ql -> 28|>, <|qsd -> 55, ql -> 28|>, <|qsd -> 75, ql -> 21, \[Beta][ISSP] -> 0|>}, 240]   ECMMonTakeValue;

Remark: The stocks in the results are only stocks that are populations – that is specified with the string expression pattern ___~~”Population”.

Here is the shape of the result:

Short /@ res1

0a1hc3qgvuof7

Here are the corresponding plots:

ListLinePlot[#, PlotTheme -> "Detailed", ImageSize -> Medium, PlotRange -> All] & /@ res1

1veewx20b1778

Focus population

We might be interested in the batch simulations results for only one, focus populations. Here is an example:

res2 =    ecmObj2    ECMMonBatchSimulate["Infected Normally Symptomatic Population", {<|qsd -> 60, ql -> 28|>, <|qsd -> 55, ql -> 28|>, <|qsd -> 75, ql -> 21, \[Beta][ISSP] -> 0|>}, 240]    ECMMonTakeValue;

Here is the shape of the result:

Short /@ res2

0es5cj4hgrljm

Here are the corresponding plots:

Multicolumn[ KeyValueMap[  ListLinePlot[#2, PlotLabel -> #1, PlotTheme -> "Detailed",     Epilog -> {Directive[Orange, Dashed],       Line[{Scaled[{0, -1}, {#1[qsd], 0}], Scaled[{0, 1}, {#1[qsd], 0}]}],       Line[{Scaled[{0, -1}, {#1[qsd] + #1[ql], 0}], Scaled[{0, 1}, {#1[qsd] + #1[ql], 0}]}]},     ImageSize -> Medium] &, res2]]

17ofnpddvw8ud

Outer product of parameters

Instead of specifying an the combinations of parameters directly we can specify the values taken by each parameter using an association in which the keys are parameters and the values are list of values:

res3 =    ecmObj2    ECMMonBatchSimulate[__ ~~ "Population", <|qsd -> {60, 55, 75}, ql -> {28, 21}|>, 240]    ECMMonTakeValue;

Here is the shallow form of the results

Short /@ res3

1e260m2euunsl

Here are the corresponding plots:

Multicolumn[ KeyValueMap[  ListLinePlot[#2, PlotLabel -> #1, PlotTheme -> "Detailed",     Epilog -> {Directive[Gray, Dashed],       Line[{Scaled[{0, -1}, {#1[qsd], 0}], Scaled[{0, 1}, {#1[qsd], 0}]}],       Line[{Scaled[{0, -1}, {#1[qsd] + #1[ql], 0}], Scaled[{0, 1}, {#1[qsd] + #1[ql], 0}]}]},     ImageSize -> Medium] &, res3]]

1u4ta8aypszhz

Calibration workflow

In this section we go through the computation steps of the calibration of single-site SEI2HR model.

Remark: We use real data in this section, but the presented calibration results and outcome plots are for illustration purposes only. A rigorous study with discussion of the related assumptions and conclusions is beyond the scope of this notebook/document.

Calibration steps

Here are the steps performed in the rest of the sub-sections of this section:

  1. Ingest data for infected cases, deaths due to disease, etc.
  2. Choose a model to calibrate.
  3. Make the calibration targets – those a vectors corresponding to time series over regular grids.
    1. Consider using all of the data in order to evaluate model’s applicability.
    2. Consider using fractions of the data in order to evaluate model’s ability to predict the future or reconstruct data gaps.
  4. Choose calibration parameters and corresponding ranges for their values.
  5. If more than one target choose the relative weight (or importance) of the targets.
  6. Calibrate the model.
  7. Evaluate the fitting between the simulation results and data.
    1. Using statistics and plots.
  8. Make conclusions. If insufficiently good results are obtained go to 2 or 4.

Remark: When doing calibration epidemiological models a team of people it is better certain to follow (rigorously) well defined procedures. See the documents:

Remark: We plan to prepare have several notebooks dedicated to calibration of both single-site and multi-site models.

USA COVID-19 data

Here data for the USA COVID-19 infection cases and deaths from [NYT1] (see [AA6] data ingestion details):

lsCases = {1, 1, 1, 2, 3, 5, 5, 5, 5, 6, 7, 8, 11, 11, 11, 12, 12, 12,12, 12, 13, 13, 14, 15, 15, 15, 15, 25, 25, 25, 27, 30, 30, 30, 43, 45, 60, 60, 65, 70, 85, 101, 121, 157, 222, 303, 413, 530, 725,976, 1206, 1566, 2045, 2603, 3240, 4009, 5222, 6947, 9824, 13434, 17918, 23448, 30082, 37696, 46791, 59678, 73970, 88796, 103318, 119676, 139165, 160159, 184764, 212033, 241127, 262275, 288195, 314991, 341540, 370689, 398491, 423424, 445213, 467106, 490170, 512972, 539600, 566777, 590997, 613302, 637812, 660549, 685165, 714907, 747741, 777098, 800341, 820764, 844225, 868644, 895924, 927372, 953923, 977395, 998136, 1020622, 1043873, 1069587, 1095405,1118643, 1137145, 1155671, 1176913, 1196485, 1222057, 1245777, 1267911, 1285105, 1306316, 1326559, 1349019, 1373255, 1395981, 1416682, 1436260, 1455183, 1473813, 1491974, 1513223, 1536848, 1559020, 1578876, 1600414, 1620096, 1639677, 1660303, 1688335, 1709852, 1727711, 1745546, 1763803, 1784049, 1806724, 1831494, 1855870, 1874023, 1894074, 1918373, 1943743, 1970066, 2001470, 2031613, 2057493, 2088420, 2123068, 2159633, 2199841, 2244876, 2286401, 2324563, 2362875, 2411709, 2461341, 2514500, 2573030, 2622980, 2667278, 2713656, 2767129, 2825865, 2885325, 2952393, 3012349, 3069369, 3129738, 3194944, 3263077, 3338308, 3407962, 3469137, 3529938, 3588229, 3653114, 3721574, 3790356, 3862588, 3928575, 3981476, 4039440, 4101329, 4167741, 4235717, 4303663, 4359188, 4408708, 4455340, 4507370, 4560539, 4617036, 4676822, 4730639, 4777548, 4823529, 4876038, 4929115, 4981066, 5038637, 5089258, 5130147, 5166032, 5206970, 5251824, 5297150, 5344322, 5388034, 5419494, 5458726, 5497530, 5541830, 5586297, 5631403, 5674714, 5707327, 5742814, 5786178, 5817338, 5862014, 5917466, 5958619, 5988001, 6012054, 6040456, 6073671, 6110645, 6157050, 6195893, 6228601, 6264192, 6301923, 6341145, 6385411, 6432677, 6472474, 6507345, 6560827, 6597281, 6638806, 6682079, 6734971, 6776512, 6812354, 6847745, 6889421, 6930523, 6975693, 7027692, 7073962, 7107992, 7168298, 7210171, 7261433, 7315687, 7373073, 7422798, 7466501, 7513020, 7565839, 7625285, 7688761, 7757326, 7808123, 7853753, 7916879, 7976530, 8039653, 8113165, 8193658, 8270925, 8328369, 8401001, 8473618, 8555199, 8642599, 8737995, 8814233, 8892933, 8983153, 9074711, 9182627, 9301455, 9436244, 9558668, 9659817, 9784920, 9923082, 10065150, 10222441, 10405550, 10560047, 10691686, 10852769, 11011484, 11183982, 11367840, 11561152, 11727724, 11864571, 12039323, 12213742, 12397014, 12495699, 12693598, 12838076, 12972986, 13135728, 13315143, 13516558, 13728192, 13958512, 14158135, 14325555, 14519697, 14731424, 14954596, 15174109, 15447371, 15647963, 15826415, 16020169, 16218331, 16465552, 16697862, 16941306, 17132902, 17305013, 17498382, 17694678, 17918870, 18106293, 18200349, 18410644, 18559596, 18740591, 18932346, 19157710};
lsDeaths = {0, 0, 0, 0, 0, 0, 0, 0, 0, 0, 0, 0, 0, 0, 0, 0, 0, 0, 0, 0, 0, 0, 0, 0, 0, 0, 0, 0, 0, 0, 0, 0, 0, 0, 0, 0, 0, 0, 0, 1, 3, 6, 10, 12, 12, 15, 19, 22, 26, 31, 37, 43, 50, 59, 63, 84, 106, 137, 181, 223, 284, 335, 419, 535, 694, 880, 1181, 1444, 1598, 1955, 2490, 3117, 3904, 4601, 5864, 6408, 7376, 8850, 10159, 11415,12924, 14229, 15185, 16320, 18257, 20168, 21941, 23382, 24617, 26160, 27535, 29821, 31633, 33410, 35104, 36780, 37660, 38805, 40801, 42976, 44959, 46552, 48064, 49122, 50012, 52079, 54509, 56277, 57766, 59083, 59903, 60840, 62299, 63961, 65623, 67143, 68260, 68959, 69633, 71042, 72474, 73718, 74907, 75891, 76416, 76888, 77579, 79183, 80329, 81452, 82360, 82904, 83582, 84604, 85545, 86487, 87559, 88256, 88624, 89235, 90220, 91070, 91900, 92621, 93282, 93578, 93988, 94710, 95444, 96123, 96760, 97297, 97514, 97832, 98638, 99372, 101807, 102525, 103018, 103258, 103594,104257, 104886, 105558, 106148, 106388, 106614, 106998, 107921, 108806, 109705, 110522, 111177, 111567, 111950, 112882, 113856, 114797, 115695, 116458, 116854, 117367, 118475, 119606, 120684, 121814, 122673, 123105, 124782, 126089, 127465, 128720, 130131, 131172, 131584, 132174, 133517, 134756, 135271, 136584, 137547, 138076, 138601, 140037, 141484, 142656, 143793, 144819, 145315, 145831, 147148, 148517, 149550, 150707, 151641, 152065, 152551, 153741, 154908, 156026, 157006, 157869, 158235, 158714, 159781, 160851, 161916, 162869, 163573, 163970, 164213, 164654, 165811, 166713, 167913, 168594, 168990, 169423, 170674, 171663, 172493, 173408, 174075, 174281, 174689, 175626, 176698, 177559, 178390, 179145, 179398, 179736, 180641, 181607, 182455, 183282, 183975, 184298, 184698, 185414, 186359, 187280, 188168, 188741, 189165, 189501, 190312, 191267, 192077, 192940, 193603, 193976, 194481, 195405, 196563, 197386, 198271, 199126, 199462, 199998, 200965, 201969, 202958, 203878, 204691, 205119, 205623, 206757, 208331, 209417, 210829, 211838, 212277, 212989, 214442, 215872, 217029, 218595, 219791, 220402, 221165, 222750, 224641, 226589, 228452, 229868, 230695, 231669, 233856, 236127, 237284, 238636, 239809, 240607, 241834, 244430, 247258, 250102, 252637, 254784, 255857, 257282, 260038, 263240, 266144, 268940, 271172, 272499, 274082, 277088, 280637, 283899, 286640, 289168, 290552, 292346, 295549, 298953, 301713, 302802, 304403, 305581, 307396, 310994, 314654};

Remark: The COVID-19 data was ingested from [NYT1] on 2020-12-31,

Calibration targets

From the data we make the calibration targets association:

aTargets = <|{ISSP -> 0.2 lsCases, INSP -> 0.8 lsCases, DIP -> lsDeaths}|>;

Remark: Note that we split the infection cases into 20% severely symptomatic cases and 80% normally symptomatic cases.

Here is the corresponding plot:

ListLogPlot[aTargets, PlotTheme -> "Detailed", PlotLabel -> "Calibration targets", ImageSize -> Medium]

1u9akes6b4dx0

Here we prepare a smaller set of the targets data for the calibration experiments below:

aTargetsShort = Take[#, 170] & /@ aTargets;

Model creation

modelSEI2HR = SEI2HRModel[t, "TotalPopulationRepresentation" -> "AlgebraicEquation"];

Here are the parameters we want to experiment with (or do calibration with):

lsFocusParams = {aincp, aip, sspf[SP], \[Beta][HP], qsd, ql, qcrf, nhbcr[ISSP, INSP], nhbr[TP]};

Here we set custom rates and initial conditions:

aDefaultPars = <|    \[Beta][ISSP] -> 0.5*Piecewise[{{1, t < qsd}, {qcrf, qsd <= t <= qsd + ql}}, 1],     \[Beta][INSP] -> 0.5*Piecewise[{{1, t < qsd}, {qcrf, qsd <= t <= qsd + ql}}, 1],     qsd -> 60,     ql -> 8*7,     qcrf -> 0.25,     \[Beta][HP] -> 0.01,     \[Mu][ISSP] -> 0.035/aip,     \[Mu][INSP] -> 0.01/aip,     nhbr[TP] -> 3/1000,     lpcr[ISSP, INSP] -> 1,     hscr[ISSP, INSP] -> 1    |>;

Remark: Note the piecewise functions for (\beta [\text{ISSP}]) and (\beta [\text{INSP}]).

Calibration

Here is the USA population number we use for calibration:

usaPopulation = QuantityMagnitude@CountryData["UnitedStates", "Population"](*329064917*)

Here is we create a ECMMon object that has default parameters and initial conditions assigned above:

AbsoluteTiming[  ecmObj3 =     ECMMonUnit[]     ECMMonSetSingleSiteModel[modelSEI2HR]     ECMMonAssignInitialConditions[<|TP[0] -> usaPopulation, SP[0] -> usaPopulation - 1, ISSP[0] -> 1|>]     ECMMonAssignRateRules[KeyDrop[aDefaultPars, {aip, aincp, qsd, ql, qcrf}]]     ECMMonCalibrate[      "Target" -> KeyTake[aTargetsShort, {ISSP, DIP}],       "StockWeights" -> <|ISSP -> 0.8, DIP -> 0.2|>,       "Parameters" -> <|aip -> {10, 35}, aincp -> {2, 16}, qsd -> {60, 120}, ql -> {20, 160}, qcrf -> {0.1, 0.9}|>,       DistanceFunction -> EuclideanDistance,       Method -> {"NelderMead", "PostProcess" -> False},       MaxIterations -> 1000      ];  ](*{28.0993, Null}*)

Here are the found parameters:

calRes = ecmObj3ECMMonTakeValue(*{152516., {aip -> 10., aincp -> 3.67018, qsd -> 81.7067, ql -> 111.422, qcrf -> 0.312499}}*)

Using different minimization methods and distance functions

In the monad the calibration of the models is done with NMinimize. Hence, the monad function ECMMonCalibrate takes all options of NMinimize and can do calibrations with the same data and parameter search space using different global minima finding methods and distance functions.

Remark: EuclideanDistance is an obvious distance function, but use others like infinity norm and sum norm. Also, we can use a distance function that takes parts of the data. (E.g. between days 50 and 150 because the rest of the data is, say, unreliable.)

Verification of the fit

maxTime = Length[aTargets[[1]]];
ecmObj4 =    ECMMonUnit[]    ECMMonSetSingleSiteModel[modelSEI2HR]    ECMMonAssignInitialConditions[<|TP[0] -> usaPopulation, SP[0] -> usaPopulation - 1, ISSP[0] -> 1|>]    ECMMonAssignRateRules[Join[aDefaultPars, Association[calRes[[2]]]]]    ECMMonSimulate[maxTime]    ECMMonPlotSolutions[___ ~~ "Population" ~~ ___, maxTime, ImageSize -> Large, LogPlot -> False];

12rw9e4vl0vy0

aSol4 = ecmObj4ECMMonGetSolutionValues[Keys[aTargets], maxTime]ECMMonTakeValue;
Map[ListLogPlot[{aSol4[#], aTargets[#]}, PlotLabel -> #, PlotRange -> All, ImageSize -> Medium, PlotLegends -> {"Calibrated model", "Target"}] &, Keys[aTargets]]

10kkuh7578jjz

Conclusions from the calibration results

We see the that with the calibration found parameter values the model can fit the data for the first 200 days, after that it overestimates the evolution of the infected and deceased popupulations.

We can conjecture that:

  • The model is too simple, hence inadequate
  • That more complicated quarantine policy functions have to be used
  • That the calibration process got stuck in some local minima

Future plans

In this section we outline some of the directions in which the presented work on ECMMon can be extended.

More unit tests and random unit tests

We consider the preparation and systematic utilization of unit tests to be a very important component of any software development. Unit tests are especially important when complicated software package like ECMMon are developed.

For the presented software monad (and its separately developed, underlying packages) have implemented a few collections of tests, see [AAp10, AAp11].

We plan to extend and add more complicated unit tests that test for both quantitative and qualitative behavior. Here are some examples for such tests:

  • Stock-vs-stock orbits produced by simulations of certain epidemic models
  • Expected theoretical relationships between populations (or other stocks) for certain initial conditions and rates
  • Wave-like propagation of the proportions of the infected populations in multi-site models over artificial countries and traveling patterns
  • Finding of correct parameter values with model calibration over different data (both artificial and real life)
  • Expected number of equations for different model set-ups
  • Expected (relative) speed of simulations with respect to model sizes

Further for the monad ECMMon we plant to develop random pipeline unit tests as the ones in [AAp12] for the classification monad ClCon, [AA11].

More comprehensive calibration guides and documentation

We plan to produce more comprehensive guides for doing calibration with ECMMon and in general with Mathematica’s NDSolve and NMinimize functions.

Full correspondence between the Mathematica and R implementations

The ingredients of the software monad ECMMon and ECMMon itself were designed and implemented in Mathematica first. The corresponding design and implementation was done in R, [AAr2]. To distinguish the two implementations we call the R one ECMMon-R and Mathematica (Wolfram Language) one ECMMon-WL.

At this point the calibration is not implemented in ECMMon-R, but we plan to do that soon.

Using ECMMon-R (and the RStudio’s Shiny ecosystem) allows for highly shareable interactive interfaces to be programed. Here is an example: https://antononcube.shinyapps.io/SEI2HR-flexdashboard/ .

(With Mathematica similar interactive interfaces are presented in [AA7, AA8].)

Model transfer between Mathematica and R

We are very interested in transferring epidemiological models from Mathematica to R (or Python, or Julia.)

This can be done in two principle ways: (i) using Mathematica expressions parsers, or (ii) using matrix representations. We plan to investigate the usage of both approaches.

Conversational agent

Consider the making of a conversational agent for epidemiology modeling workflows building. Initial design and implementation is given in [AA13, AA14].

Consider the following epidemiology modeling workflow specification:

lsCommands = "create with SEI2HR;assign 100000 to total population;set infected normally symptomatic population to be 0;set infected severely symptomatic population to be 1;assign 0.56 to contact rate of infected normally symptomatic population;assign 0.58 to contact rate of infected severely symptomatic population;assign 0.1 to contact rate of the hospitalized population;simulate for 240 days;plot populations results;calibrate for target DIPt -> tsDeaths, over parameters contactRateISSP in from 0.1 to 0.7;echo pipeline value";

Here is the ECMMon code generated using the workflow specification:

ToEpidemiologyModelingWorkflowCode[lsCommands, "Execute" -> False, "StringResult" -> True](*"ECMMonUnit[SEI2HRModel[t]] ECMMonAssignInitialConditions[<|TP[0] -> 100000|>] ECMMonAssignInitialConditions[<|INSP[0] -> 0|>] ECMMonAssignInitialConditions[<|ISSP[0] -> 1|>] ECMMonAssignRateRules[<|\\[Beta][INSP] -> 0.56|>] ECMMonAssignRateRules[<|\\[Beta][ISSP] -> 0.58|>] ECMMonAssignRateRules[<|\\[Beta][HP] -> 0.1|>] ECMMonSimulate[\"MaxTime\" -> 240] ECMMonPlotSolutions[ \"Stocks\" -> __ ~~ \"Population\"] ECMMonCalibrate[ \"Target\" -> <|DIP -> tsDeaths|>, \"Parameters\" -> <|\\[Beta][ISSP] -> {0.1, 0.7}|> ] ECMMonEchoValue[]"*)

Here is the execution of the code above:

Block[{tsDeaths = Take[lsDeaths, 150]}, ToEpidemiologyModelingWorkflowCode[lsCommands]];

0cs73r03ki1mi

0227wiq3locdf

Different target languages

Using the natural commands workflow specification we can generate code to other languages, like, Python or R:

ToEpidemiologyModelingWorkflowCode[lsCommands, "Target" -> "Python"](*"obj = ECMMonUnit( model = SEI2HRModel())obj = ECMMonAssignInitialConditions( ecmObj = obj, initConds = [TPt = 100000])obj = ECMMonAssignInitialConditions( ecmObj = obj, initConds = [INSPt = 0])obj = ECMMonAssignInitialConditions( ecmObj = obj, initConds = [ISSPt = 1])obj = ECMMonAssignRateValues( ecmObj = obj, rateValues = [contactRateINSP = 0.56])obj = ECMMonAssignRateValues( ecmObj = obj, rateValues = [contactRateISSP = 0.58])obj = ECMMonAssignRateValues( ecmObj = obj, rateValues = [contactRateHP = 0.1])obj = ECMMonSimulate( ecmObj = obj, maxTime = 240)obj = ECMMonPlotSolutions( ecmObj = obj, stocksSpec = \".*Population\")obj = ECMMonCalibrate( ecmObj = obj,  target = [DIPt = tsDeaths], parameters = [contactRateISSP = [0.1, 0.7]] )"*)

References

Articles

[Wk1] Wikipedia entry, Monad.

[Wk2] Wikipedia entry, “Compartmental models in epidemiology”.

[Wk3] Wikipedia entry, “Coronavirus disease 2019”.

[BC1] Lucia Breierova, Mark Choudhari, An Introduction to Sensitivity Analysis, (1996), Massachusetts Institute of Technology.

[JS1] John D.Sterman, Business Dynamics: Systems Thinking and Modeling for a Complex World. (2000), New York: McGraw.

[HH1] Herbert W. Hethcote (2000). “The Mathematics of Infectious Diseases”. SIAM Review. 42 (4): 599–653. Bibcode:2000SIAMR..42..599H. doi:10.1137/s0036144500371907.

[AA1] Anton Antonov, ”Monad code generation and extension”, (2017), MathematicaForPrediction at GitHub/antononcube.

[AA2] Anton Antonov, “Coronavirus propagation modeling considerations”, (2020), SystemModeling at GitHub/antononcube.

[AA3] Anton Antonov, “Basic experiments workflow for simple epidemiological models”, (2020), SystemModeling at GitHub/antononcube.

[AA4] Anton Antonov, “Scaling of Epidemiology Models with Multi-site Compartments”, (2020), SystemModeling at GitHub/antononcube.

[AA5] Anton Antonov, “WirVsVirus hackathon multi-site SEI2R over a hexagonal grid graph”, (2020), SystemModeling at GitHub/antononcube.

[AA6] Anton Antonov, “NY Times COVID-19 data visualization”, (2020), SystemModeling at GitHub/antononcube.

[AA7] Anton Antonov, “SEI2HR model with quarantine scenarios”, (2020), SystemModeling at GitHub/antononcube.

[AA8] Anton Antonov, “SEI2HR-Econ model with quarantine and supplies scenarios”, (2020), SystemModeling at GitHub/antononcube.

[AA9] Anton Antonov, Modelers questionnaire, (2020), SystemModeling at GitHub/antononcube.

[AA10] Anton Antonov, Calibrators questionnaire, (2020), SystemModeling at GitHub/antononcube.

[AA11] Anton Antonov, A monad for classification workflows, (2018), MathematicaForPrediction at WordPress.

Repositories, packages

[WRI1] Wolfram Research, Inc., “Epidemic Data for Novel Coronavirus COVID-19”, WolframCloud.

[WRI2] Wolfram Research Inc., USA county records, (2020), System Modeling at GitHub.

[NYT1] The New York Times, Coronavirus (Covid-19) Data in the United States, (2020), GitHub.

[AAr1] Anton Antonov, Coronavirus propagation dynamics project, (2020), SystemModeling at GitHub/antononcube.

[AAr2] Anton Antonov, Epidemiology Compartmental Modeling Monad R package, (2020), ECMMon-R at GitHu/antononcube.

[AAp1] Anton Antonov, State monad code generator Mathematica package, (2017), MathematicaForPrediction at GitHub/antononcube.

[AAp2] Anton Antonov, Monadic tracing Mathematica package, (2017), MathematicaForPrediction at GitHub/antononcube.

[AAp3] Anton Antonov, Epidemiology models Mathematica package, (2020), SystemModeling at GitHub/antononcube.

[AAp4] Anton Antonov, Epidemiology models modifications Mathematica package, (2020), SystemModeling at GitHub/antononcube.

[AAp5] Anton Antonov, Epidemiology modeling visualization functions Mathematica package, (2020), SystemModeling at GitHub/antononcube.

[AAp6] Anton Antonov, System dynamics interactive interfaces functions Mathematica package, (2020), SystemModeling at GitHub/antononcube.

[AAp7] Anton Antonov, Multi-site model simulation Mathematica package, (2020), SystemModeling at GitHub/antononcube.

[AAp8] Anton Antonov, Monadic Epidemiology Compartmental Modeling Mathematica package, (2020), SystemModeling at GitHub/antononcube.

[AAp9] Anton Antonov, Hextile bins Mathematica package, (2020), MathematicaForPrediction at GitHub/antononcube.

[AAp10] Anton Antonov, Monadic Epidemiology Compartmental Modeling Mathematica unit tests, (2020), SystemModeling at GitHub/antononcube.

[AAp11] Anton Antonov, Epidemiology Models NDSolve Mathematica unit tests, (2020), SystemModeling at GitHub/antononcube.

[AAp12] Anton Antonov, Monadic contextual classification random pipelines Mathematica unit tests, (2018), MathematicaForPrediction at GitHub/antononcube.

[AAp13] Anton Antonov, Epidemiology Modeling Workflows Raku package, (2020), Raku-DSL-English-EpidemiologyModelingWorkflows at GitHu/antononcube.

[AAp14] Anton Antonov, External Parsers Hookup Mathematica package, (2019), ConversationalAgents at GitHub.